Level up your Digital CS strategy with Calendar booking links

  • 4 January 2024
  • 8 replies
  • 255 views

Userlevel 5
Badge +2

Scheduling meetings can be very time consuming; and can often be the reason why customers don’t schedule meetings at all. Reducing the friction between both account management teams (i.e - Customer Success Managers, Account Managers, Solution Architects, etc.) and customers can help significantly with improving the response rate of your requests for a meeting.


One tool to help with this is Calendly. A popular calendar booking service that allows third parties to select a time slot that is convenient for both them and you, without the need for long email chains back and forth. Calendly in particular has some great features such as round-robin scheduling (great for pooled teams) and group bookings (great when you want both a Customer Success Manager and Account Manager to attend).


Once your team has selected a tool such as Calendly, the next challenge is getting your customers to book the time at the right point in their customer journey. This can vary between all sorts of different use cases, but to name a few, here are some examples:


  • Quarterly Business Reviews (QBR)

  • Account Renewals

  • Upsell/Cross Sell opportunities

  • CSM Handovers

  • Re-engaging with customers


The best way to achieve this outcome is to leverage the power of Gainsight CS’s Journey Orchestrator and Gainsight PX. To help get you started, here’s one example of how it can be done.
 

Scenario

Today, all of your customer success managers manage the day-to-day operations of your customer accounts, including the contract renewal process. You have recently signed up for a service such as Calendly and want to send automated emails to customers 90 days from their contract expiration requesting a call with their customer success manager using their unique calendar booking link.


Step-By-Step Guide

The first challenge is to add unique links to each of your customer success manager profiles in Gainsight CS. To achieve this, we’ll need to use the Data Management feature.


Note: If you do not see these options or do not have access, please reach out to your Gainsight administrator for assistance


  1. Using the left-hand navigation, select Administration followed by Customer Data, and then Data Management

    CNnbXNY_Hu3wZk8JABt4XWPxKgOjj4FZGnS7kYD3-B8mpcY6mJ0O8pTZLhQrfEZiSw76O3LxZcLSnKTsMS-b_v39vI2cE7kM95U9kh-oUyVg55wCGKhIX0hY37jMsbt4icqQzCHcaMccEFLxYjNd01M
     

  2. Locate the User object from the list. (You may need to use the search feature for this) and press the sTJJaGvY_vIzc_YwAwIlW9FJ1mEQak7ovCmNmGJUiRCX5B9Ii_uo3BjrEY8dCePOwpvRMlxscPCVnx7KXJIQ95SMUxtLLpu7VKIN5hedwlULIaTjS4YYqaXYf-BnINNY8U1rY0KFmSlEmqyLzfc5OKo icon, followed by Edit Objects

    T53Kbk-YAoeqMHXlF8I4GdYJ3K-DweHhNqtfClALuH3bsuP4ip5PlR3H0H1YLrXgAwuWAze9st1H6U53pM-OZvii4wgOBHwji4q306iqLOspRz95yYLaaF5nqKA8bGTYb-xR6LrBI66ThiMfF1T-F5g
     

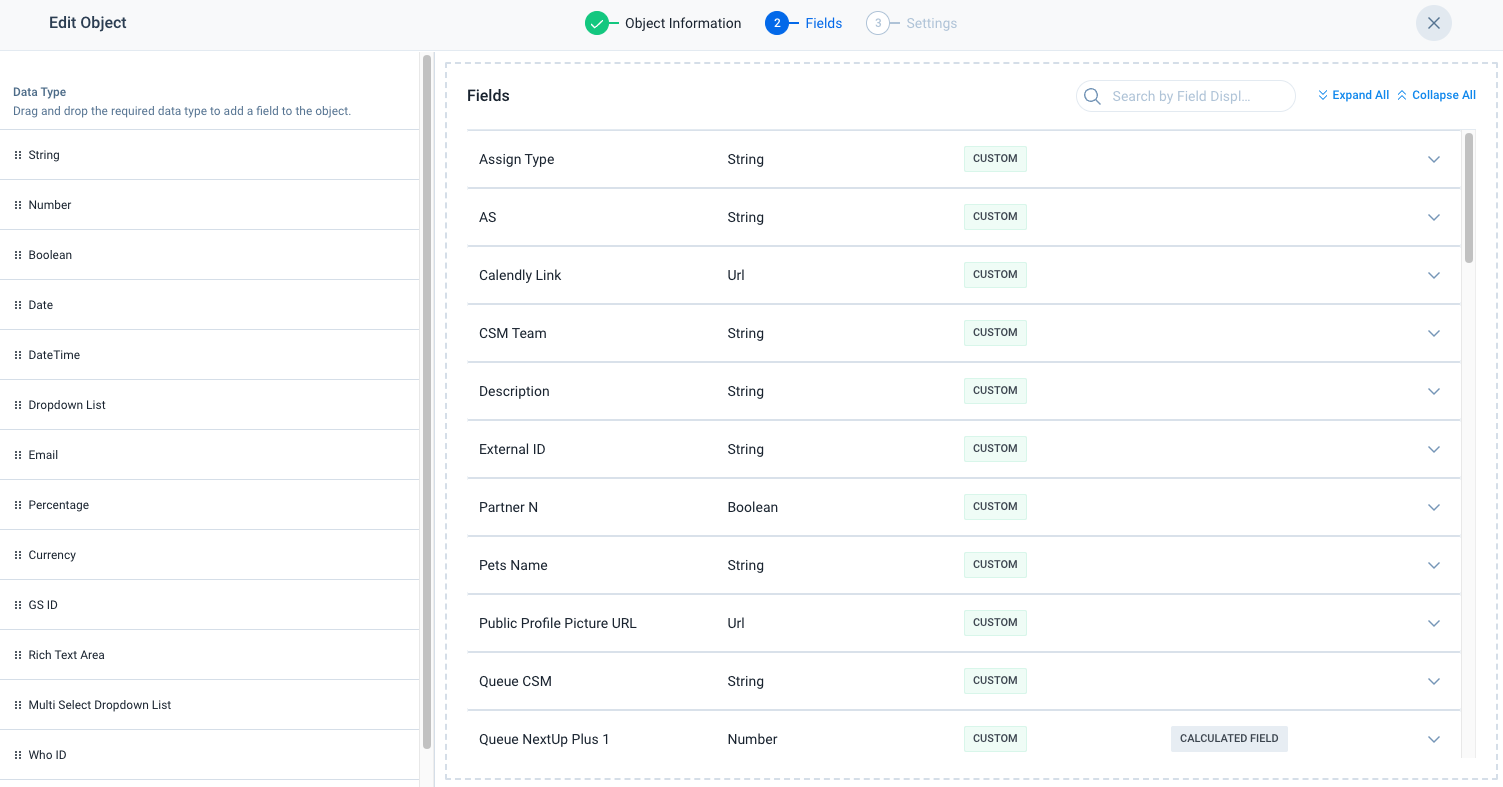
  3. Press Next at the bottom right to skip the Object Information section and you should now be presented with a list of fields to add/edit

    gSkc8e6v8rRbFg9J9PFJrJyOLvA4s_SfJ_P6Xj7HqyVVBCmutLJm7ekg6NKac0Qgj80Ndagq5IK9XkJ9VUee-OgQhmVSiLyKPXsb2Ss50fGKaU72tAVFyWcwoO7oRrAaBXrIWzuDndW7q8KGbAvWIN8
     

  4. Drag and drop the Url data type from the left-hand side to the right, then give the field a name as you see fit

    pitAzAcLp_-8fR_g4saDRSD7dDVBTRmjrZ9iTYbJ0KRLf9CfU-rjaLoFSqsQbAVuPxbc6daFSCLxYdc8Hy_ek6aO_EPLlGrc2STGNxNFnNUjisAuxQoJOXP1NAkdIqeqgJD1FKN3EdFK8q0u9F7wolI

    If there are any other fields you wish to add at this point, go ahead and do it now.
     

  5. Once done, press Save and Close at the bottom right of your screen

Now the field is created, we need to populate the fields on our teams user profiles.
 

Note: If you do not see these options or do not have access, please reach out to your Gainsight administrator for assistance


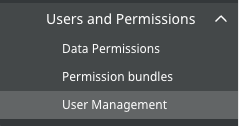
  1. Using the left-hand navigation, select Administration followed by Users and Permissions, and then User Management

    b40XxL5kQxXZJsISYmsdznrL1kY0TEYBKxlobEwvX4qFAXlcwV-5QwRsJsNbCCBc7ToLfjXpfvvJOLw5T_3M4FRXfKzWfMt66k8_M-fW3UcjKKppEX8_LMrZ9BemfIVoaqkDcSEbJ8n7mPyhznDq6Yo
     

  2. Locate the user who you wish to edit, press the ob41RopVUSwK3KMzb9kd_MPyNFs2ngtMDH0ze6UfE9MKY20U7kXjfC31jDw9cKtx0QkuUrAvLOMY16M5RkNwhFy_nn7GmBVNGCNzHl5Qu6wB0ByHIdjoDzT1j500FiF25DPXcDcjt9W69D6nco4R4SY icon on the right-hand side of the row, and press Edit User

    rbkUocBEnhMgZ6pt5mpcARXzLKzwqvQjxLtBEg14EapVgq1zqpilBe1kYxtUfNkKH1oJ-c7wXWuBALi19sZP31L0MCtwNIs03rKuPnRhyQdcZaFWRGsqJbYCzRVfPJssZdtAhdvNqV5DLSOJD0lDqpY
     

  3. As you scroll down on the users profile, you will now see a Custom Fields section with your newly created field. Go ahead and add the relevant calendar booking URL to this section and hit Update

    Repeat this process for all of your customer success managers.


Great work! If you have been following along, you should now have a new custom field added to all of your Gainsight CS customer success managers with it populated accordingly.


The final step is leveraging the new calendar booking link into automated email flows using Journey Orchestrator. A common mistake is to start to create the program before having the email drafted. To avoid this, let’s create the email template first.


Note: If you do not see these options or do not have access, please reach out to your Gainsight administrator for assistance


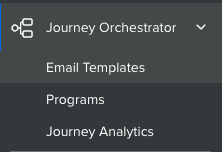
  1. To start, select Journey Orchestrator from your left-hand navigation, followed by Email Templates

    kMkg1jftu7oNkqaFIqrhh8X8oxJ0sc2Zwah_RfvAb0kiYsr91cWgHfv5_Ln-OAs5qOStaA-JQBbgrOc_GRIRgJRwTaHntOvzYu3hXDS6SX0JrPxENc0HnHg39gMC9vL6HziDzbatcUGnf03dSC4WEeA
     

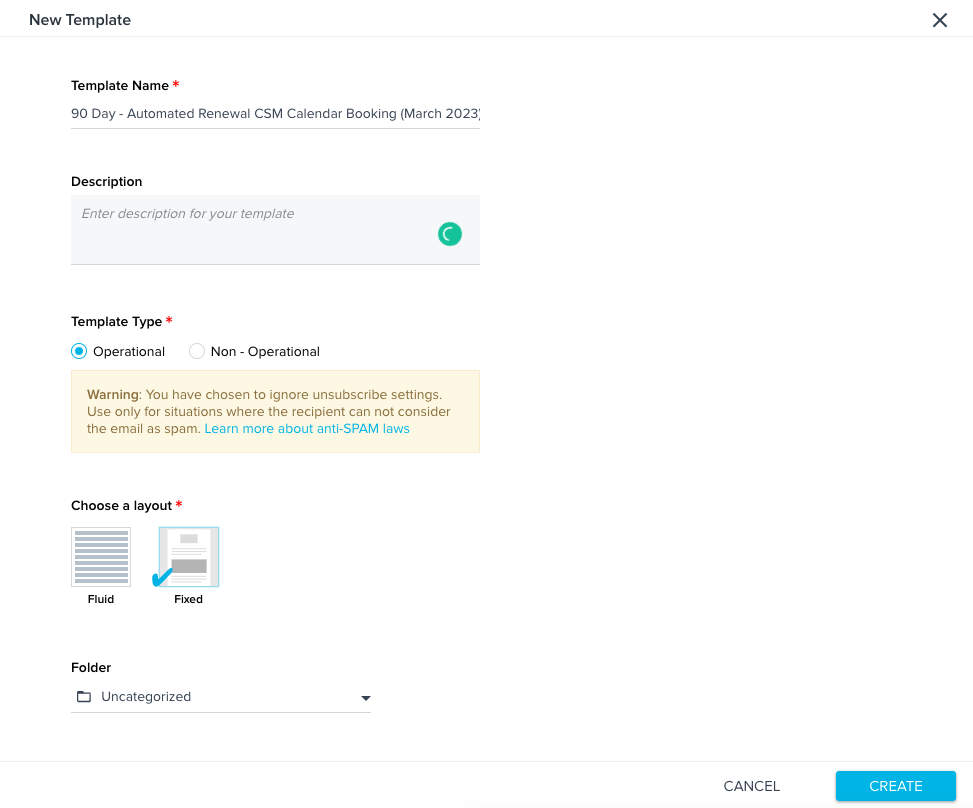
  2. At the top right-hand side of the screen, press Create and populate the New Template form as you see fit, and then press Create

    Note: In the example we provided below, we have set the Template Type as Operational. This should only be used when the recipient can not consider the email spam. Learn more about anti-SPAM laws if you are unsure

    0uEYmqnlRt5I5_J8-mEtFqWipepKk_RexRNsjrtQPJaWvJ7wTFH0eQlLspD2LYzYWeFm0k5Gr_SCG4Buc0WThSn6wAwWs4i7kOgqXq3ITB0F9dmsJiC5_kcIN1GMp9-mdmzwAXwVIokJS9AqIVI4Eas
     

  3. Create your renewal email by populating the email subject and the body of the email. Don’t be afraid to use images and colors here to make it look in-keeping with your corporate branding

    Pf-txRzjeSw7A-k0WyMmdsa-FziXebQv-0kFgphVbcjNgmgvdJBMnsvO2GNSTqc5YqOPzkc3ttzhrVm2Q335hnKqzt8rbbvCZsNPbLIOXQslP-7DPneIb7A2QBulPNnLSGkvzFZXY5AkZd3yNxe2JC8
     

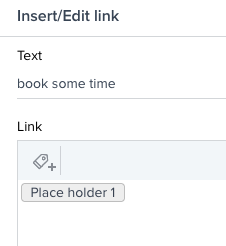
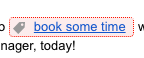
  4. Once your email is completed, locate the text which you wish to hyperlink to the calendar booking service. Then, highlight the text and press the ijersSVJlE_99AHodxl4P6gK21RkDq1YOFwxHqrpMM0M8hL9RT3wD4eZuXgR4i1tGZotC4Sc95xhX9ZZQpdQ_rdIufpvMtBWUFsoGZ1MjOeCGxoEIEj2NWS4yoiHFkkYHrVEU49t4_qKXXk7YdNARok icon at the top

    ccdUZB8O1isv3sICM4TRqVRkpR2YymXyPbF5uh6zbkoB5COfvBh1Op-7vx32RFaN00z9hSiQ4grmIfGkXTdYcVQuGxTZZb-jERLKeBH8NVmX31niagcAOWC7Zyt97E4-BfThaxUPJ1GnIY5J7t0suIw
     

  5. Within the popup dialogue, under the Link section, press the BPIbaaRS1_nP6-oiSM1SuDOf7fnd_4Xhtx7lclFl3og_eM3mrrMXVZfhCFJ5c431B_TRM9gKYDVMh2g9AYkJ5cJLeItsgM2oO5Wu7xDmUiDwzRfPn0eZZ22qD7EXEat5uWLDdNdKJuSJGOEKfn8LyNs icon to insert a tokenized placeholder

    fwppKOdTeE64jpHG1qhC2LUTkL-pe_6N3wv-N_KDsCOSrX5cl_D1m45hy7V3r6xP8321JhKsnSOVYMb6_PZwQ9tW5D-kMueeiPIoZmzzQ7zU-1Ndn8l9Xm1dw63ClZ54Bhcir7i7gRcNe_g_O9dxfYY
     

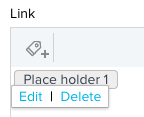
  6. Click the Place holder and press Edit when prompted

    nt_cKsM36r-9BkcPFo6FdHMCXkjHnK0klyM0weDzJhuAXDzZ_7Z7PlHnRkUk4G0ce4fmTFPCS2Z_PzK0yb-qsYL2FOFIinXVAcxeD32e0eZdbnYakrslrxkwQo8duhqPGfZgCGBzOnmZi7-cRH-geTQ
     

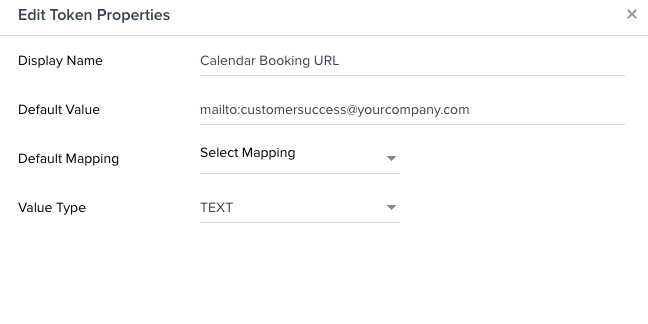
  7. It is recommended at this stage to specify the Display Name and Default Value. For the purposes of our example, we’ll set the default value as an email address (make sure to include the mailto: at the beginning to ensure it is a valid link). This email address be a shared email group/inbox to ensure visibility by as many people as possible

    4yibZoxso4-H3v7Owv5yECpMCB-Me7qDhpW8ujhnYZAE-hy2DknrS3qSJ_w5tcnBv9kPza2bMxr1PzaA1bCKXr8j7YNuM7XU-eiYWo1VUztDTfcnsoMvOOS43omXSxNPmH5Mv0vH9ilrPehp_1IyfNo
     

  8. Press Update, followed by Submit on the Insert/Edit link dialogue
     

  9. Press Save on your email, followed by the boeFun9lK7bG4B9HB-u2v0NG7ihUT_CB7gvtBW-c9z6Oo0cyacY97pUt63cc2La-6XahvYblzuTCiHra3BmUal3SCAtrAoNDdS3u7ugVdjFob5GCk_B81SznkJoLAKdrtzI3T9WD3HKBVWanO6ZsMWIicon at the top left-hand corner


Now we have our email template created, we can begin the task of creating the automated program. 


Note: If you do not see these options or do not have access, please reach out to your Gainsight administrator for assistance


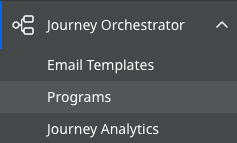
  1. Using the left-hand navigation, select Journey Orchestrator, followed by Programs

    Oh-Q-m_p0RPpLGGWwg1yB4tgwSae_L2Ynuaa7F-fXoQbOd6buQKWQEjKaJvPbdKxAIYgWmQOqckTaBSRkBu2zQz1hKzS2PyaRi_CXtpcimKou7pMTf2XSU3tSzJgC0baugrIAYAVy_jeVKt7XO-xM00
     

  2. On the top right-hand side of the Programs page, select the Add Program option, followed by Advanced Program (You can use a Simple Program here if you prefer but the instructions will differ)

    3TApUNpMG5a2RTIUP-Ovb4-SgO2rrM5qSiO-kiVO4cIWjqpbjfm8_v1HTdZHQKfj-m0hDzCtGdkYebq_NMTSidvBgOD5bv04SfSZo4QW2_9y6NOp17seBUfWDcCBTC4xogkx64bhtsRkOQFimrNWLKc
     

  3. Give your program a name, make sure the Type is set to Company, and the Model is set to Email Chain. Then hit Save

    h3jIl3JoEHKkanqimdkYmEi0D5t-rzAYjm-m9KUz0Fy9yim0IeXqHs3XbTtr3VoSnugWsFZFHCFn9bZ7-_awUkiZ8ZQ_UvyB98PYoKcqO1Pa0er6uZ-x30moLBBK-PX7DZg3j2209un5_0pRUIPl1lI
     

  4. The first step of any new journey is to create the Audience. Left-click on the green box with the people icon

    hrl5lfn8TC0plF8Iw7gASsBV8W5e-UMXVqTxNkPq5hmpRqdnfZozwoiEYGMfppNdxrXMyqVC9rmii9P8B3RgdG4CmUSoWa2UrWfH2Xt_u0yZkaGWEP0d4fxO5SvEjY0IUBpmdKLmmbafg52ueFZlsC4
     

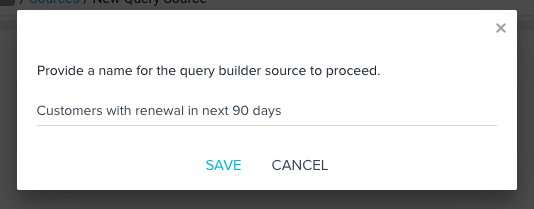
  5. Add a source by pressing + SOURCE at the top right-hand side, followed by Query Builder

    JiQoQM-sK2Or6PysmSpxoeD7h0RybX6rgS9IFgEfTXyNWHJ9pjuBccry-Y8QHb55Y9WSzC8a3sL6HUABPx6P4JS8ggBBvrZs7QbwHDXTeAzgv-oflSFvDmrcjRrtZsJ_Jz8yS8wZU3mKryRBeyUVnQk
     

  6. Provide a name for the query builder and then press Save

    g8U2BFX75N6gcXZTOTi-YbakxYsqG_qPzCwn65O9D8HdSwLvvpZtpQv64Ml1EnO6YLlx-mIF-spR1Q9YADquczODwCymH5MZXJU-YKeWK1ILEc_maaCkVzpE_7NS09Hb9JuFwc3O7mLonah-0-iclNE
     

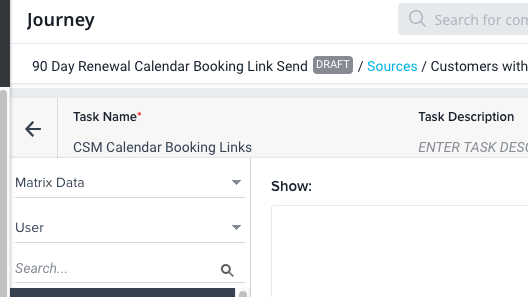
  7. From here we want to start by creating a Dataset task. The preferred way to do this is by selecting Task at the top right-hand side, followed by Dataset

    NKYy6a4Me1OycKbS8QppcciXdTdb9vbIR0xS7mgsC-cqpaop0qdxcWrhUtFunmlewQsvxb4M2YZjgFb9Morc5ckF6Ny31adxdeBNFSyjDix0UcAKlyHnBNLMI81eBvae0wyQR1sIypBGg1mw1B-h7Nk

    Note: Where most of your data is located can differ for each customer, however, we will walk you through how to add the custom field we previously created as a Dataset. If you are unsure how to locate your customer companies and contacts, check out our Education center where we have a great course on getting started with Journey Orchestrator
     

  8. Give your task a name at the top of the page, then at the top left-hand side of the Task editor, make sure that you have Matrix Data selected, followed by User

    gRlm4GmO8fqRmOGSY1ZB3diOD0nLTK73yT4VugfPItbY6qw6ocPnwHSFYOzDXuoaI1Zb24bsxhTaKQzwfwHgo_r7nOj41vEfbW9YH1rjZCTckDV_n4rCYXbi-JlB-kuwRkmxBYEL4iAwsT_CkZRavp8
     

  9. Drag the desired fields across to the Show section of the task editor. The ones we recommend for this will be

    1. GSID (Used to link your customer success manager with your customer company profile)

    2. First Name

    3. Email

    4. Your newly created custom field (as shown above)

    -qw5PKoKlvpaKysHcoq3SnVWjFRxFPLJ-w_sIuInpdYmfdXs5kMKOKXaL2ARnPVdzC9r7POMf9XgQFKO83F2VwN4cQULomX2bavtJRiM0Ev2esdcvnvGOwi7evvIeZTEqnAJM5DprHpSeSHd6t2lfyk

    Tip: Press Preview to get a sneak peek at the results of this task. (Recommended to make sure you select the correct fields)
     

  10. Then press Save followed by the g4ofD4PvaPJIa4xMqhtnbAsS1mLdLGUEceQ35ccaob9LTZB1rSVF-g362g2O4GnWz2qxsught892rLlGUjHSdwEMe1vzVTEdUo_ZY2mO_V2xOYrIdQcXFay1XeDFvORpZAzlp2iM7beCeWPV5GojFEE icon at the top left
     

  11. Complete a similar step to add your customer company and contact data. Make sure to use the Merge task to combine all of your Dataset tasks at the end

    Note: Where most of your data is located can differ for each customer. If you are unsure how to locate your customer companies and contacts, check out our Education center where we have a great course on getting started with Journey Orchestrator
     

  12. Once your data is ready, set a schedule by pressing the Schedule option at the top right, followed by Add all the participants in the query builder and ensure to include any participant added in the future

    vyXHIBYV4dLHzp1TmfHSfCiWdgFgHTK01aKw8to-aGgM6qox5ve2DX4nzICA1JZod1x0jANCHIxclRCPSxwCbfLYvjPF39zjSuSJpgDX49AUUYs14iAwrMOWK3y2IYgjAn0H4FJBQM96NdDYGX-A1Hw
     

  13. Press Save on the schedule dialogue, followed by Back to Sources
     

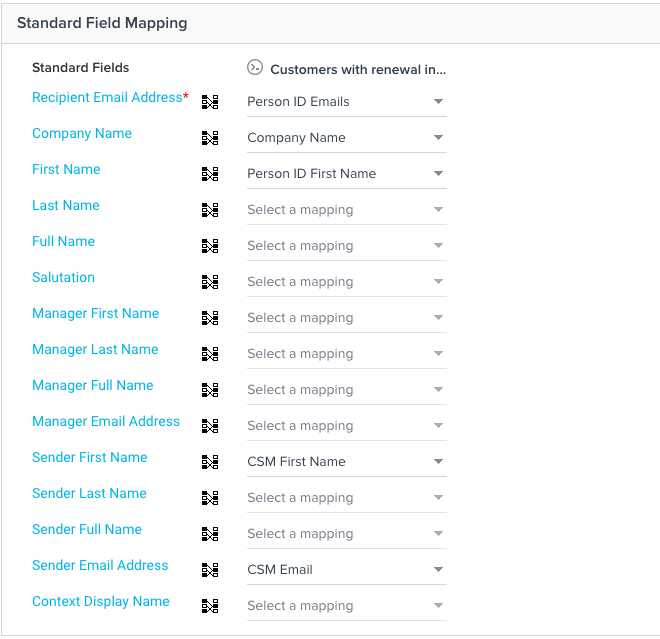
  14. Next, complete step Two, Filter Criteria on Participants as needed, and then select the third step, Mapping Participant Sources
     

  15. Map the relevant fields for the Standard Field Mapping section, including Recipient Email Address and any other fields you would like

    x4xn_fpYL97bNJpFncQ7ScqbRIoxJEgz_SmNM4SHUdbeTe-uA_Rat9L2-sA-_j3BB8uR8FYHO2tH6RhdOcIS0T6sMHFI8mYfaGghxYxkuCkmXuYDkeIxRJox-IRNiDCNGfzJXf_aC-L0I2cO0E_A42E
     

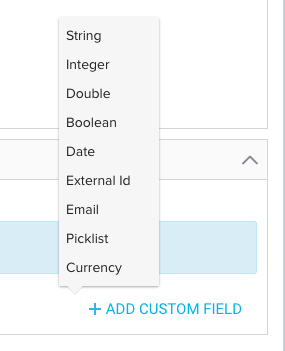
  16. Scrolling down the page you will find a Custom Field Mapping section. At the bottom right-hand side, press the Add Custom Field option, followed by String

    7psYxIfEZAyfFVgxSc4EU0nT5DIydEqaRMjNiPngsBLHpJyJA8w7rNfeN4BPmerBL5jA4OVaSM-WTX4vJ6rrYyuhEJaDBeRo0NntFqoMzJcFWOPE3NSW7FMdclnUDuo121Eo-UN7_Ox8vtoyPd0y5hE
     

  17. Populate the Display Name and select the mapping to your calendar booking link along with any other custom fields you wish to add, then press Save

    6pMeXlWtqK7yK-OWEl47-UfBsGwiL9pnPygccBAdUK_Ipq5KMm3PKAbY-NReghTAlDuspR3UmvdxhVI0axfbz-yWJ-B5raBGNc9yZUKuUHhz35dE8O9IpEyXXlvGJQfx5upDqbz37DSG7jDSnxp8oMg
     

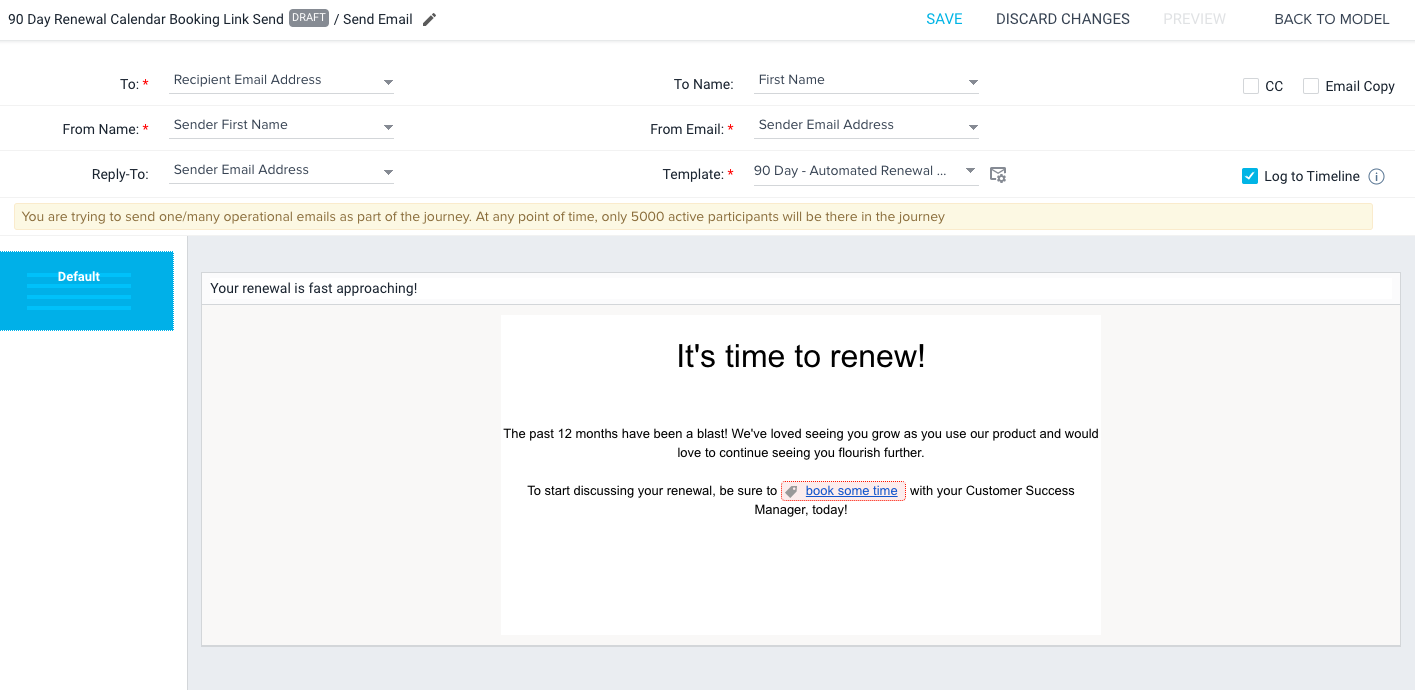
  18. At the top right-hand side of the screen, press the Back to Model option and select the pencil icon as you hover over the blue Send Email box

    XXH319FZKVrBWYTN0rKLwlw_XLJWqXb2eDdNb8AE_IhQyFeWB6Nd9v2UibkpRQC967Gt_yAzU5CAd4bpDt4Z3SnjJVwo6u0UXhZGx102pBoTXTtSA0mrFl0qsrFOjSYwxAlRmc0kXaPjWvA61EOUvtE
     

  19. Select and/or populate the relevant fields at the top of the screen, making sure to select the corresponding email template

    41dhiDXTDZB693TYWdXALp7dAvKYpJZATYJ0DW3fJz-bWIerJNrFRj1YdTrm_bdtgW7f_bjBKQwLCt_LCTFIahXjrYo9LH31YFZxaXBsCgTdSX9tFqji7Tz0ktntjbDOSRoDiLHHnMhWycs0_HoNjaU
     

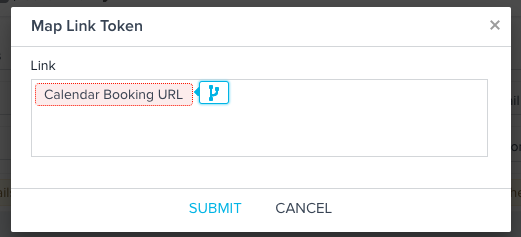
  20. On your email template, click on the Red token which was specified earlier

    SkhhytthqAEgZ4cOPXa18ejVt1Mr4ZRRVb4Awj3ijJ0WugIFYAmj6aD5CHuDiecQsdV4utjSVVoicG3jiKPtNBhKv3r9b7V0Xf9uhfxaApWSbvcK7a7UKy4q4vd8u0cFVi1MUxFLO_oPr1kaNkHZNV8
     

  21. Hover over the Red Token shown in the dialogue box and press the Map Fields icon shown, selecting the corresponding map field from the list

    4WpKytu4u8DMP0upNLa6fgasY77wqoKgWBF62c9nXH5zx7mi0ATH8R6SH2IhghrYSuxTt9_J3bGRNU25fcBbPW8VWihgJowkHlgmMCmmd6wyn1aKdliv39M-FJ1tP-cm1wUOK3PXXIz_N14G-_JpZTo
    jr6jk7Lu62tjYDbGsnuFV9TYmk_iWc91y9wLCh0JAJ2vyU8FHCxv2r0W3Rxw-yXLpUYccySOPZioH_q3AUYCnyL3ZvAs90n4i-74O9iTALsEgjCraLxhEFZa1HA3eXrdJ46a18xvV2lm9QUYgxwqLoU
     

  22. Press Submit on the dialogue window, followed by Save and Back to Model
     

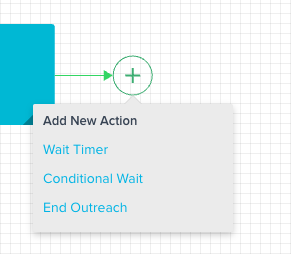
  23. Press the final icon (+) at the end of the journey and select End Outreach

    5Zqe4IV0AMjxw1PYXJKVamvC5oFw_rCsyFFBrWeVYNY0zT04_sjvj68Tclfu4JOYbR7E-8vDESR1UyVLkN7x1-5jIamLJcYw1pQyuZ77j96MOzmiMHlQutIdpUis6S70IkcSRe0FD5bd_FvQY0du_fs
     

  24. Press Save once more and after checking thoroughly you are all set to Publish the journey


Other Considerations

Sending an automated renewal email with a link to book time with your customer success managers is just one example of how this functionality could work. It’s also possible to leverage the Gainsight PX integration to send curated, personalized in-app dialogues via Journey Orchestrator as shown in the examples below:


vjVsRE3YpEgYMMNl7PA7-2EGTmhoR9SeK2j49KFcQV6Wn840YMRXdvxq7PrCR9K55fegJ7VJxuXRi4yGtMrSTAGKkPLgysKRTbor0TweZFLVv0vfCNkJNysLNfMATtdqO9A1D4Ndj08xYk1e55Pg2ho
gCANUZiJwsnZTUvFHEsQ8zMgLJ23GmtQf8cCqNsgLM7YNpiKDl5t0vXbwoF9ps_sQiPxKhfJYvPdK-CoirDXDEex60njQ1dQgm189N4DABAfW2CNX1Oi_TdNDgDU-SNFYoN0E2ZaboUCN4sxHI1m2nM
 

Journey Orchestrator paired with Gainsight PX can be a power couple for any customer success team hoping to create digital engagements. What other ways could you use these features? Let us know in the comments below.


About the author

My name is Aaron Hatton and I am a Digital Program Manager at Gainsight, helping develop Digital Customer Success strategies to elevate the Gainsight experience for all our customers and products. Follow me for more useful tips and tricks like this in the future.


8 replies

Userlevel 5
Badge +4

This is a fantastic walkthrough, @aaronhatton -- not just of using Calendly links tokenized to a user’s CSM, but on including ANY tokenized links in JO programs! And a great reminder to build out the template before the program. 😀

I sometimes build out the programs before the templates, but that’s generally when we’re using a multi-step query and complex conditional journey logic, so that I can keep building out the program structure while the email content is agreed upon. 😆 

Userlevel 1
Badge +6

Very helpful post - We’re implementing this now and was looking for some best practice info and this is perfect. Thanks for this!

Userlevel 5
Badge +4

Dream state for me (@aaronhatton, does this sound feasible?) would be to create a “Signature” token for our CSx’s that they could update themselves (that would enable them to create an HTML-coded signature with multiple lines such as name, title, department/role, etc. and a link to their calendar) so we’d only need to include one token in those emails.

If we need to use multiple fields to accomplish that, that’s feasible as well, but having one token would certainly be easier.

Would love to be able to create a “User Headshot” token as well, give it the image type, and bring that in to deliver a richer email experience. Given that the company logo is available, it should theoretically be possible. Looks like you submitted the original idea here! 


Userlevel 1
Badge +6

@dayn.johnson You’re going down the path I was and took it a bit further which I think is great. My initial thought was to make the Calendar link available in User settings so admins don't own updating for every user but taking it further for the whole signature is even better. 

Userlevel 5
Badge +4

My only thought would be that we’d need to either include a “Calendar Link is not null” filter in the query, or we’d need to make a default variant that was “Calendar Link is null” so participants didn’t receive an email with a inactive appointment link.

Userlevel 5
Badge +2

@dayn.johnson, @Wihoward is right in their suggestion to have users manage the Calendly link. I personally would suggest having the fallback being the option to email their CSM instead if it is blank. Possibly even with a team email? (i.e - customersuccess@company.com)


In terms of using a photo, that is also possible but would be require for the image to be stored elsewhere and the link pasted into the User settings.


Finally, this would unfortunately require multiple user settings instead of one. This does come with the advantage of additional select data points to pull from but appreciate it is a greater lift for CSMs/admins (if you opt to update your users for them)

Userlevel 5
Badge +4

@Wihoward is right in their suggestion to have users manage the Calendly link. I personally would suggest having the fallback being the option to email their CSM instead if it is blank. Possibly even with a team email? (i.e - customersuccess@company.com)

In terms of using a photo, that is also possible but would be require for the image to be stored elsewhere and the link pasted into the User settings.


Thank you for the response, @aaronhatton!

We’d definitely build this (appointment link) in as an additional option for them, and would request that they add it, but would build in the fallback as the default option. I’d think we’d probably have the default keep a callout to email those CSMs (tokenized email) to set up the appointment, which might encourage them to add their calendar link if that was an option, since it would cut down on the number of one-off emails they might get to schedule a call.

Also agree on the photo -- we currently host externally (part of our collaboration with our marketing team), but would love to get our own S3 bucket to keep things from possibly breaking). But we’d definitely want control over that to make sure images were all the same size to prevent chaos.

Userlevel 1
Badge +6

@aaronhatton , @dayn.johnson thanks for all this! Do we know if this is in the backlog yet or requested? I’ve searched the community for a current Idea to upvote but haven’t found one like this one. If not, should I submit one?

Reply