How to Map your KC Bot and measure value!


Userlevel 5
Badge +3

How is the KC Bot driving value to your business? 


First thing’s first - you need to map it in order to answer that question!  Below I have provided instructions with the help of our amazing data analyst @Pau.Orti. Thanks, Pau! :)


Once you have KC Bot mapped, you can tell stories such as…..


Increased User Retention: 

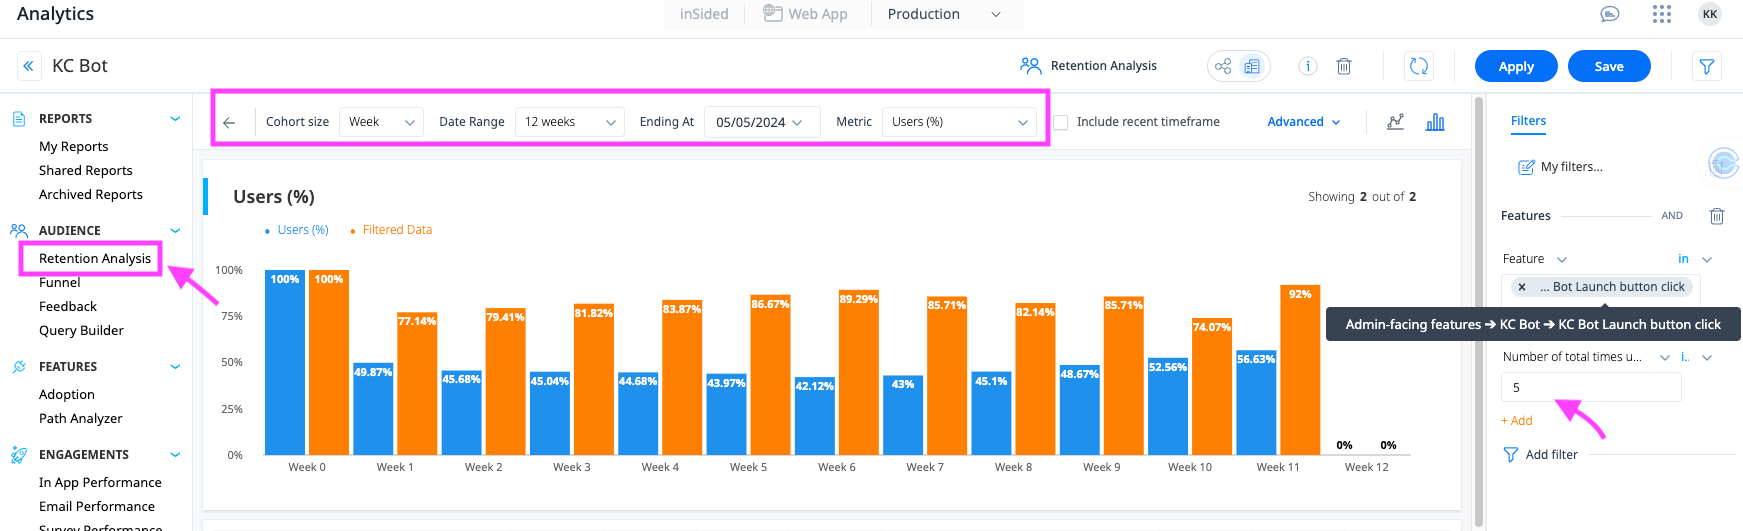
Using Retention Analysis Report in PX to showcase that users who are engaging with your KC Bot are returning back to your product at an exponential rate! 

See example below - In BLUE you will see ALL user % over the quarter of 12 weeks who are returning to the product vs. in ORANGE are users in the FILTERED section (Users who click on Feature KC Bot GREATER than 5 times.  The % of Users who meet the filtered criteria are returning to the product at a near 40% Higher rate! 😮


INSTRUCTIONS TO MAP KC BOT BELOW


Here’s a quick step-by-step guide on how we mapped our very own Gainsight Customer Communities KC Bot:


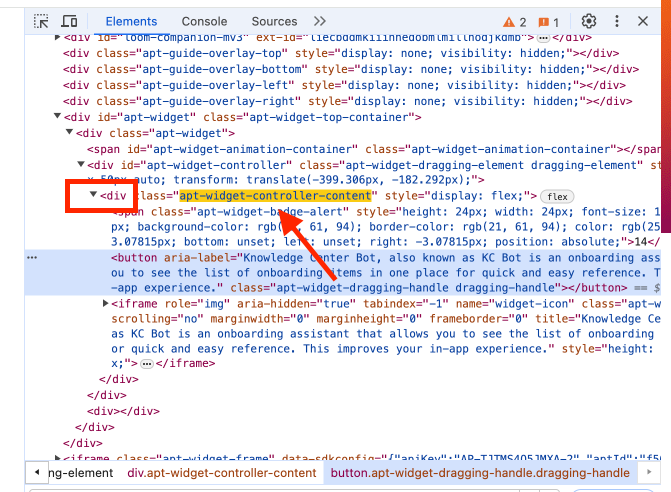
  1. Locate the KC Bot Icon: Right-click on the KC Bot icon and select “Inspect”.


XwknUxDrzM3xwOU1fBZx1joC32QfD2JNUGKCTDmiRiBPcMG7CcgjtzC54-IthGuSt8Kv1eqAgpB3edZn0AYvTQjVZUs0Jrjszwz6uxgzj0do9o1dcBawWsAde1sE2FMtC-ri0kW-4zk4wFBr3XEZ76Y


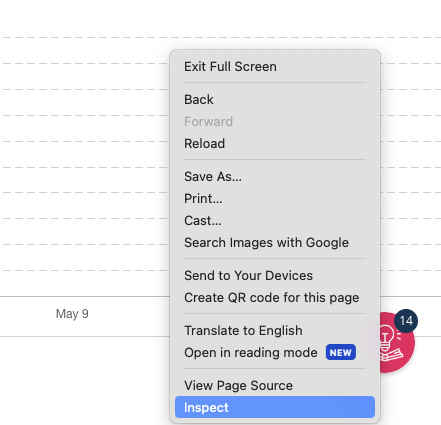
  1. Inspect Element: A panel will open on the right, highlighting the element’s code.


2IGenBX_32fypUC4-1N5cYWxkml27WHKVum2-OUHut6MS11m-VUhkuLizIF_DzZVH_r4GbPAfygR2KQD7tm9twGDXc0bqu9_NDJHD1wtanWoj0t1yGoi4y-FZzq_RDPSNxOkcAa90wTKlEXIr_dHNzA


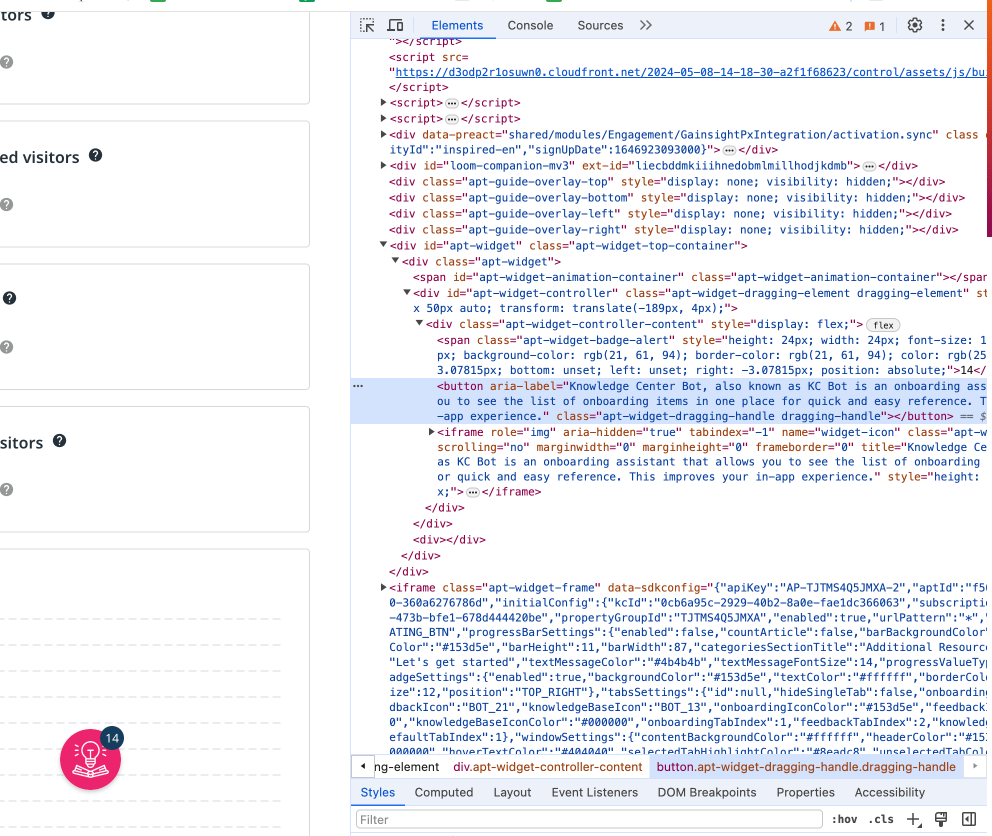
  1. Find the Class: Zoom into the relevant code and look for the class parameter. Choose one of the classes listed; it doesn't matter which one as long as it’s unique on the page.


k3OcyA0yzsnkL9TSygTUDvI0J9zPCQ3fUSfDugcVfXByysIRLNY2Q0ctIqAqUc24-I1sHuUarSWmxgveFG96e9qBwmZsY2npAb3ELlfE_nVvKOtd2C-7NIjT6bm7hMe6RHzCkruMxyKEeZEX22VAJ_U


  1. Verify Uniqueness: Copy the class name and paste it into the search bar (shortcut: Command + F) to see how many times it appears. It should appear only once.


UZpT3eydxiEbuynNUlezhh6q5Ykd3MnElTSAtoqEs2yOUYMJxb1KnNDtHeq4UcpZHWzOib2bVi_wl4lvD0hIbvLpDe8OEVAnC8gMgqVaDzmiBybm94h8m-UKZmbyCJodsSGv4kpCdilR5uX4PBMtSeI


  1. Select Another Class if Necessary: If the class appears more than once, select another. Move to the nearest “div” and repeat the uniqueness check.

YkdM2k4feTYNshpyX7cA_J1ZoM-ieqvU2wvKoW2BnVevSb0_LysSQTUZAzVFEo_q6gV9rB5RE8-oLY5s1v7m-DkgFFpO8e-uri30WxsG6INzuRm1EPQBXodBqyBTz-YGxlQDxN3Ns-GODAhHe7kQXfY


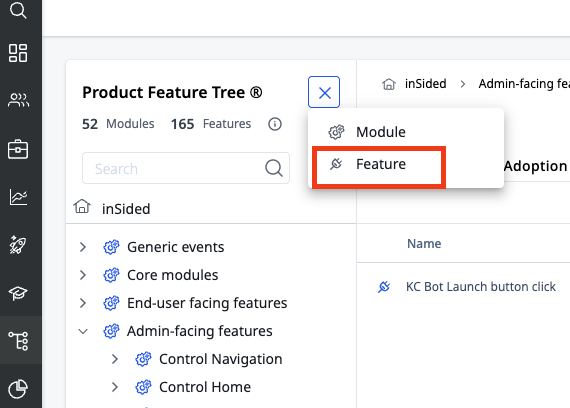
  1. Create a Feature in PX Application: Go to the PX application, add a Feature to your Product Feature Tree, and name it.


OfkUHVHK309Nd1Zdala-8skjyRDT7755xoq533ZRUnn89Xd5IO3jIrg0rQqZuTEYnpxApe30sTaSofqDsp3kVCZkoWUz12MMS2GM6bq9RFhtb3jLfDFUlbgXJICwJcEoiVm6gy0xKwOeW5Pw37e2JNg


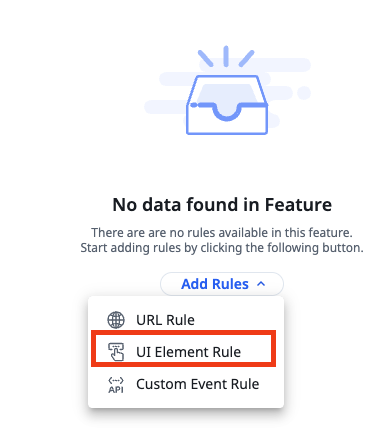
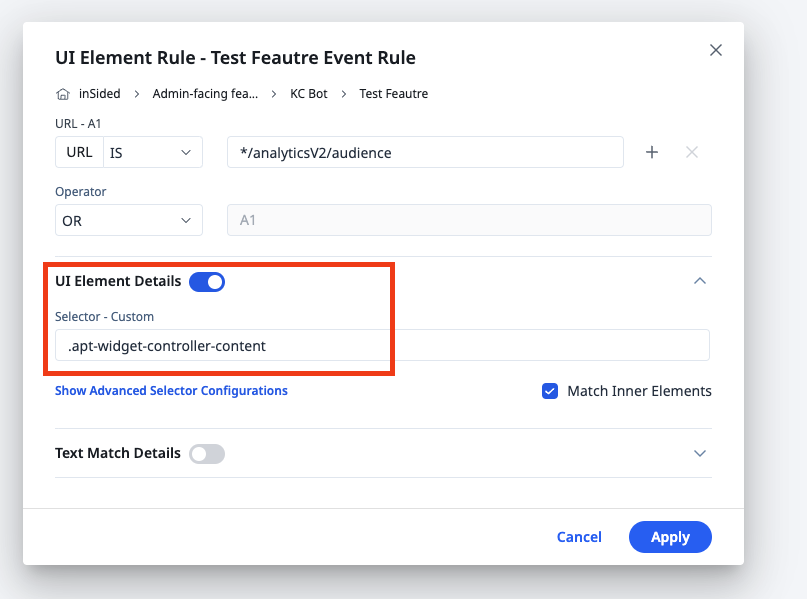
  1. Set Up UI Element Rule: Inside the feature, click on “UI Element Rule”.


0hWxpqSNh02DkIcSk_OlOdos5dUhmO232jHrRdhhfSI4Zx0_LohYd9j_69-jPOA4gzekSdvp8DOSjI55F0bShte37C-42TOuwcIyUXkNw3J94GvOVGxbKtT3IFXuS2zIBCr3I5WusRj8qLf6K8MTqH4


  1. Configure URL Details: Expand the URL Details, enter the URL from where the event is triggered, and use a wildcard * for variable parts of the URL.


Z3cIIpiJNYB8mrQuOV1Q8sf_pP_unypxLgjO0RWdEe_MpXyPt3yS1HkUoBwmP-Rl97CiHQhCM_0aGoLrrucVuf6l6g0D7r6hTVU_Cq3nIN-RQcqpYClM9cT0YvD9xUbtDTtPTwuavLHe6YdW_v6TICI


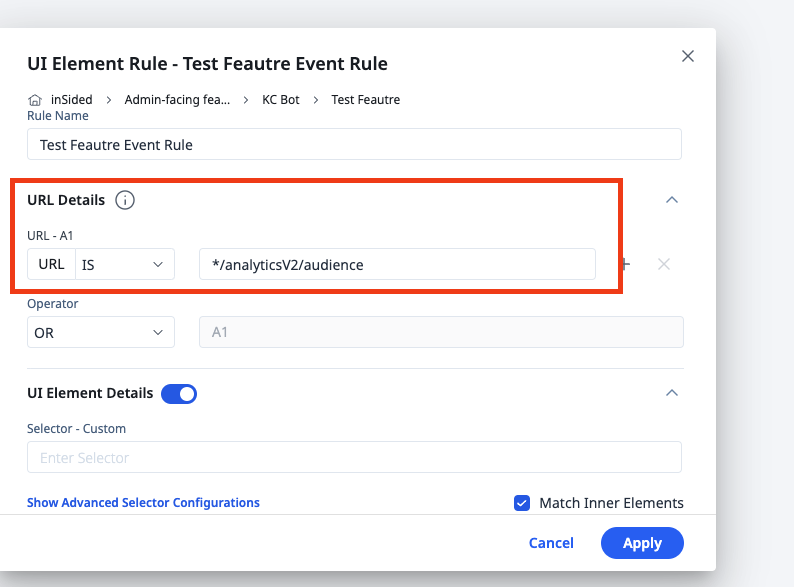
  1. Add Selector: In the Selector - Custom field, prepend a period to the class name (e.g., .apt-widget-controller-content) to indicate it’s a class. Save your changes.


7B24hhHdCFlZkh1PFkuZHU7mEGgR0f2uvDf5qVPtYPYcIED53YKc6ZHvvZe2bCoG-P1d5jBDC911lNk_KfH0AVMLDMcvDO_6i8IxvcBXDEYZy-jUivqUjOCQTuWOmBymEiClBLBtMQ70lXfSw-Z3EpE


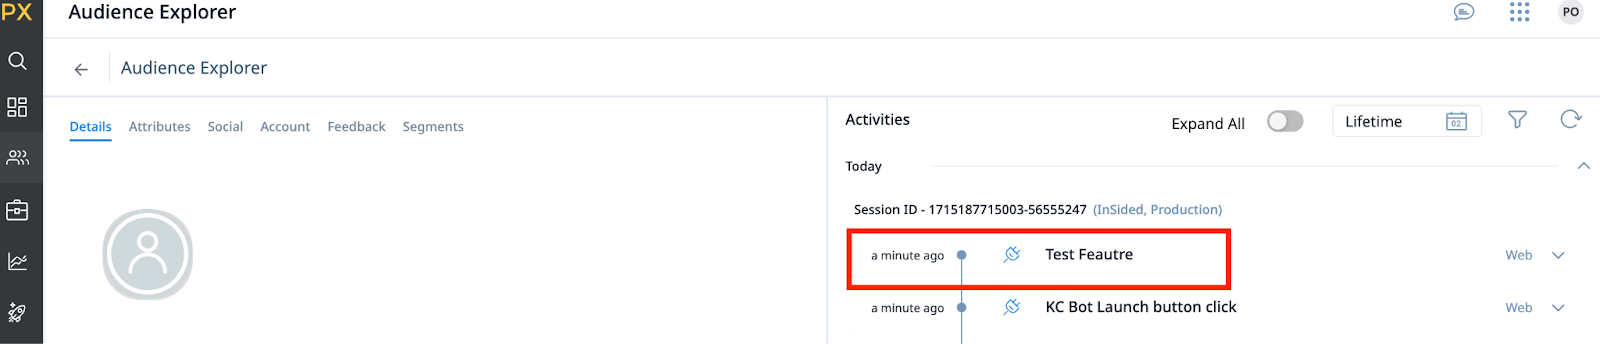
  1. Test the Event: To verify if the event is working, use Account Explorer to find your user, trigger the event, refresh the page, and check if the event is captured.


UpQqB3-TcsHzEhwcDVKbVXI3621QsZfF78LNroaKm5_pPero_M_YLim-O0_qKG2JHV6yiikY0qzuKlQTLk9N_a95HCSOMD5z8a1zu-RwOtwaq3uJ2Bqh4yhnpivhIBz0KTDIBIy2I-dadgc5YmDZrzQ


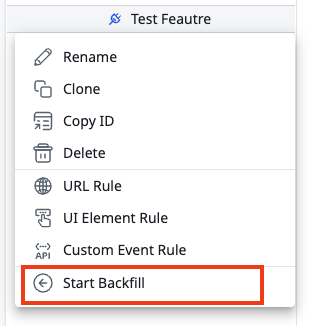
  1. Back-fill Event Data: To capture historical data, go back to the product feature tree, edit the event by clicking the pencil icon, and select “Start Backfill”.


jzwjGf67P91mulp8VFwkt-dme2kG2ZvXIpm75aSH4tuZ6NpI0Q9ctyf5YaO4Ir-g6rtUQw4b4mbJ9ScDHWayALvKBwUBepcqoIjxvaW0lt582hj2A-Ba7OdyZGC8aWik2EsCRzxtcbzeHthFk2zVFw8


What are some really cool use cases/outcomes you’ve seen with the KC Bot??


6 replies

Userlevel 5
Badge

Your post is just in time!  We have an announcement to tell new people about the self-help (KC bot), and I want to use a funnel so that I can check  whether we are driving people to the self-help.

Userlevel 5
Badge +3

Love to hear it @mmarques !  My spidey senses must have been tingling 🕷 🤣


Userlevel 5
Badge

@kathleenkenny23 - Is there any reason to use a UI element selector other than  .apt-widget-controller-content?  I inspected a few of our KC bots, and don’t see anything different. 

Userlevel 5
Badge +3

@mmarques I asked a couple of our technical experts  @link_black and @rschlette 


Rob:

That’s one option. I’d use the parent div’s #apt-widget-controller id instead, but it should be the same result as .apt-widget-controller-content in this case

Link:

I usually use "#apt-widget-controller" too, but either will work fine.


Hope this helps!

Userlevel 5
Badge

Thanks, @kathleenkenny23!

Userlevel 5
Badge +3

Any time 😉

Reply