Hello PX-Rockstars!

What I am going to share with you all today is so close to my heart 🫶
 

If you have attended our recent office hours (Recording here), you already know what I am sharing today from the title itself. But for those who could not make it - here you go; this post is a recommended guide on personalising user experiences by capturing user inputs. 
 

Over the last few months, we have seen significant updates to our V2 editor templates. Thanks to Abhilash ( @aharkut ) , our product manager, who takes the time to improve these templates to cater to various use cases. So if you see something inspirational and operational regarding dialogs/in-app engagements, you know whom to share it with. 


Let’s get to the basics of “User profiling.”

“User profiling” is the process of improving the user profile data so that we can group them into specific groups on various metrics and personalize their reach outs and engagements in multiple ways.

So user profiling is the first step you need to focus on to personalize user experiences.

How do we do this in PX today?

You can build some onboarding questionnaires into the product to get started. Still, if you don’t want to waste your engineering efforts in this process, I recommend you try our V2 engagement dialogs to do the same. 


Step 1: Select a default template from the V2 editor templates


zwRBSBivROmMIhnO1J08kh3jIvGgo0WcPLyxIEU0fcU-CnXeZji206qPZzDa9t0bvNm4EZY5Soqhe4YZOERQeH_huGViVc5Y65BFlJf6ILWA4BPImQfJb9d0C8zzvtNGcvTXUZQfrk7V2oVB2nWQURM


Step 2: We will add and edit the existing cells from this template to achieve what we want. When you hover over any section in the template, you see two symbols + and recycle bin. 


3QLvVjlTlXIEigYmbxZDfTv7QZnp15IJRLyi9FCGbgXcGKdkn6pMQxdYQczYpK-2oBo7JwocrXP35-RIZ_vJXdXwP-9K03CRZJm3r5ncIEuT25Z7s6GRFj5xwMxvSVgoQnyewZSBU18Bp_XZZ0zvSa4


Step 3: Remove all cells except the header by clicking on the “recycle bin” icon on each cell


PgT94iKJ0eda5xjvk-KjJuwp5zcGigci1LgXIlN6Fvg9rYKldZlGNQV0ld5NLCmeeN4LEdDzA93G5Yr9b9xpUWXo0cqFcXp8At_I_c_Lp8fW9uclndWapd4_zdYaz1tcwYa_4w6jyxn0C2lvCXlfF-A


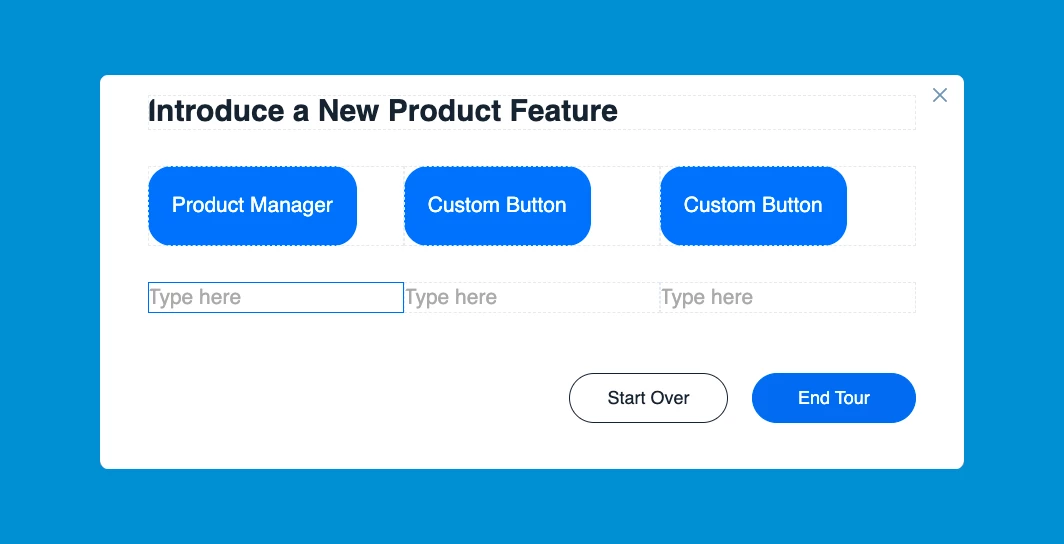
Step 4: Now let’s add a three-partition cell below this header cell by clicking on the plus icon


LEboSY_bgaqh6f0vYBegzBBZLUFJQrtNfTaIaX66vVcsV8sXZ4YIXq_8m4JO9GbXkupgScgvtxCbMbQp4ElKK6kwC6BCmQx-YROGwTpEr6bnykVfo0CDBR3RBXiKxMO3YeLPubkIQ7xukkPvVXaF2Q4


Step 5: Add a custom button to each of the three partition cells, which will look like the one below.
 

Step 6: To add the custom button, you need to add it by clicking the “insert custom button” on the editor pane.  
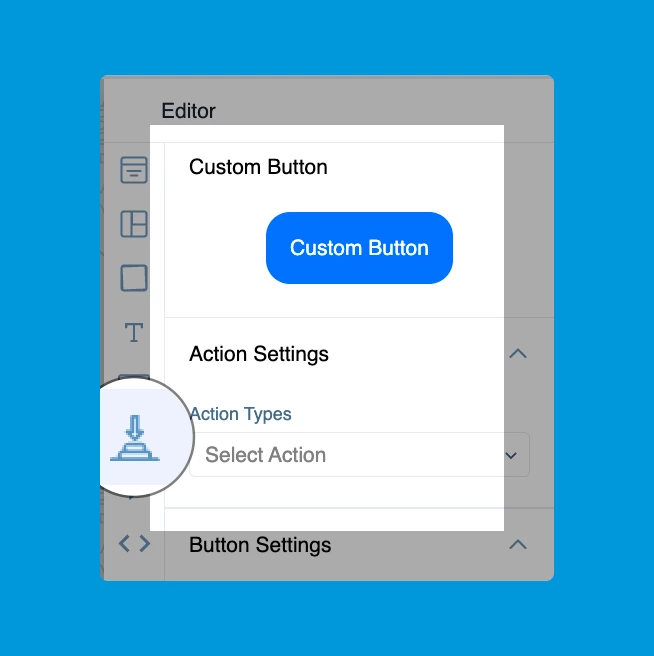
Step 7: Now edit each custom button in “Button Settings” 


PwfKybgxgR5MX6v_0z645OWR4soC0iIWBWDIXvCHCEhriZxvhiJ9CGxOsWdbnzWTBgUfrUhPF1y9oICltYcbemkzlFvqp7LvzEEhhdeWvTdan99Kt1lVTbkMwjLkv-Yq9bnyzYs8ZyEoJpKAX1xv73Y


Step 8: Set an action for the button, defining what a click on the button should do


ELWrHtX_q7-eQ5eP7Xf0dAk3qiSnPfWdg7CmH-vCcHJeupF3G6nXwauCEf5dll5tf3KR3IbOatvSomxpSLX8mz6v-mMIgoreOiosCkuwQ2lqhpOtFlmhQXKEy7ork3dMk50GjY9PCW4PgRQK39Uc_rg


Step 9: In our case, it is “Update user attribute,” so choose that field from the drop-down list. 


1nvebCVAXO9T7ca3Ts_zWtoqKTB1EtriUaCZfue5Vni-wplrAyDgp60XBCE6pHYyL-kZZOxNgXTzSaSPf9Mm_f_lu8KD8JQZo1_VQC6JOqNk8VwmMrY0Ze8C7nl5bO3IDJP_Oy79aA2rXACYFcikt70


Step 10: Now define what value the button should update in the user profile by giving a value to the user attribute as above and do the same for the rest of the buttons. 


cAuisS9eYTnS75p5kkQWI4koJZGyyJzk15YfdBf6eygND0wXExZS5MW0i20zWGaSE79WLwd14lcErFgtNR1fFBE7S30Mu0wgO6r9ei0CDkkfXYFtacM_LHJ9dbmnCi4M0qofTGs8TjFFFno4VTVeAa4

Step 11: You can update the boolean fields of a user profile using the same logic as below 


rj0rVGvl5Bl0pdlEmLFif1N255SnZWb-eEDnXH5Oq0q9PrMi1qSpw_pZIqLKMBOQJPVR2nlN2FKs-CHJMpwi7qpPJwnCS4xZVWFKFXZHLp_qLty1fLuLSJnGaNATtmLk4Tm8j6LMFcPfRIHztY8ewW4


Amazing isn’t it? 
 

User profiling is bliss to business owners and campaign strategists who wants to drive adoption using personalized journeys. This exercise will help you for sure!

Happy PX-ing!

(Did I say, FOLLOW ME for more -instead of Bye!😉)
 

LOVE this! 


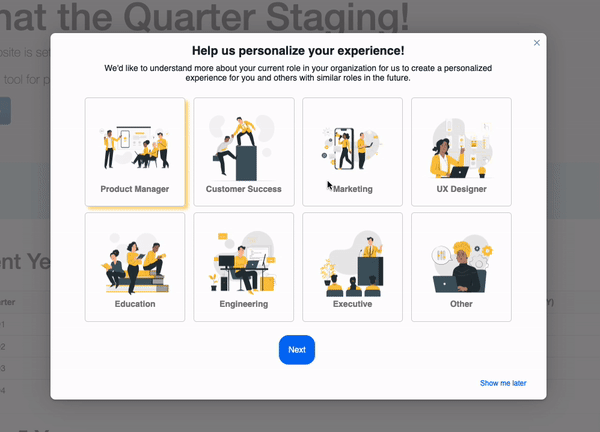
@Sruthimalla - Great post, we’re actively working on implementing this. I just saw that I was prompted with this when logging into PX:
 

 I noted that I was able to select and highlight multiple items represented by icons. This is a much better experience than what’s available with the custom buttons today. Is this a preview of what’s to come soon? Or is there a way to implement this now? Thanks!


Hey @gatherholt! This was a project I was leading and am happy to help share some insight into how we managed to get this working as you saw. (GIF below for historical purposes & full visibility)

Unfortunately as of today (June 22, 2023) we are not able to offer multiple choice buttons like you can see in the engagement natively. To overcome this challenge we used some custom HTML, CSS and Javascript to present buttons in the way you see here.

We’ll look to create a post dedicated on how to create a similar experience to this over the next few weeks and I will make sure to update this thread with the link. In the meantime to give you a quick answer - we created hidden radio buttons for the first page (confirming role) and used a label to give the appearance of a actual button. For the second page (confirming goal), we used a similar approach but with checkboxes. Whenever an option is selected, it runs an “onclick” that allows for us to execute Javascript to update the users identity.

Hope it helps!


@aaronhatton - Very cool! Sounds like a lot went into this. That would great if you’re looking to outline how this was accomplished in a new post, would love to see this!


@aaronhatton I love this as well. It is done way better than my team implemented. Any chance you would share the HTML /CCS of the engagement with us? I really like that the selections light up when clicked but not sure how to do that myself.


Additionally, I assume this is using the attribute update when the user selects it. What would happend if I clicked one and then unclicked it?


This is awesome, @aaronhatton! The setup and image sizes are great! Would love to see the HTML/CSS; would make it so much easier to replicate with our own text and images. 🙂


Hey all, thanks for your patience! I just published a separate post about the use case I shared above.

CC: @JayS @JPKelliher @gatherholt 


I have noticed that if I have multiple slides with custom buttons, it's not possible to "force" users to select an option. They are able to navigate through the slides and just close the engagement without selecting any buttons. How can I prevent this?


Hey @Tamarar! I had a similar struggle. We managed to get past this by removing the default navigation, and adding a custom button. On the HTML for the custom button we configured it to navigate to the next step and then added a “Disabled” attribute.

We then removed the Disabled attribute using JavaScript whenever a button was clicked (onClick). Here’s the code for that part.


HTML / JavaScript

onclick="document.querySelector('#pxCustomButton-xxxxxxx-xxxxx-xxxxx-xxxxx-xxxxxxxxxxx').removeAttribute('disabled');


You may notice that there is a section for: #pxCustomButton-xxxxxxx-xxxxx-xxxxx-xxxxx-xxxxxxxxxxxYou will need to find the value of this from the HTML of the custom button as every custom button is unique.


Hope it helps!


Thank you @aaronhatton. I'll try that. 


Hi @aaronhatton and @Sruthimalla.

In this and Aaron’s other post, it was mentioned there was a high response rate. Would you mind sharing a percentage of Gainsight users that completed this and have a persona showing on their PX user record?

I implemented a similar persona survey (using much of Aaron’s code) and while we do have some response, it’s not what I would consider “high.” It’s currently about 7% of active users over all of our solutions that have a persona survey. 

I’m trying to find a way to increase user’s interaction with the survey so we can increase that percentage. We are in the process of implementing Gainsight CS as well, and those teams would welcome this type of information.

I appreciate any information you can share.

Jay

cc: @jmobley @aroberts @woodlande @Gainsight2022 @wheelern 


Hey @JayS! Great question. When we created it as optional, we saw a 72% response rate and only had one user complain (which was a misunderstanding on how we use the data).

We ended up making it mandatory for all users.

If you are having issues with a low response rate, my suggestion would be to focus on the “What’s in it for me” value in the messaging. Giving insights into how this would benefit your end users. Failing that - making it mandatory and the top priority, ignoring any throttling would be the alternative solution


Thank you, @aaronhatton. Would you mind being more specific about “making it mandatory?” Do you mean removing the “X” to close it, or something else?


Hi @JayS! I’m on the team that helped build this out. You’re exactly right, as a first step we removed any X/close/skip options from the engagement. To supplement this, we modified the settings within the Schedule tab. If a user doesn’t complete the engagement, it will show up to 3 times (with at least 2 days between views) and we ignored throttling to ensure that it appears. Lastly, we set the engagement to the highest priority level so that it appears before anything else a user may qualify for.


Reply