

Tip of the Week: Using a PX Dialog Engagement to collect additional information from your users to store on their PX User Profile
I had a great conversation with one of our PX customers last week about this use case.
As a refresher, PX does not create PX Users and User attributes on its own. PX relies on your user/account data to be passed through the PX Identify call code in your applications, developer inserts/updates using our PX REST API, imports/updates using our PX Data Loader, mapped fields synched with the CRM system using our Salesforce integration, and/or updates from the Customer Success platform using our new “Load to PX” CS Rule Action type.
All of the above are great options for creating rich PX User profiles with many attributes that can be leveraged for PX Analytics and PX Engagement targeting … plus many other use cases for sure.
So, the specific use case that we discussed was… “In addition to application usage data, how can PX help us to collect additional user information that we do not already have available within our business systems, such as job role, job responsibility, interests, etc.?” Well, PX has you covered here too!

Here is how it can be done…
Our PX Web SDK (JavaScript) API has a newer method available that can be used as a standalone JavaScript call within your application or even used on a Custom Button in a PX Dialog Engagement, which is the focus of this post. This Javascript method looks like the following:
“aptrinsic('set', 'user', {'[attribute_api_name]':’[attribute_value]’});"
[attribute_api_name] is the PX User Attribute API name from your Users Model in PX.
[attribute_value] is the PX User attribute value you want to record on the users profile in PX.
While you cannot add a bunch of JavaScript code to the source of a PX Engagement, you can make simple JavaScript calls when the user clicks a Custom Button using the “onclick” <a href> property. You will need to edit the source code of your Engagement to do this, but it is not hard, and below is an example screenshot of how this can be implemented on a PX custom button:

And here is how the actual PX Dialog Engagement could look for your users:

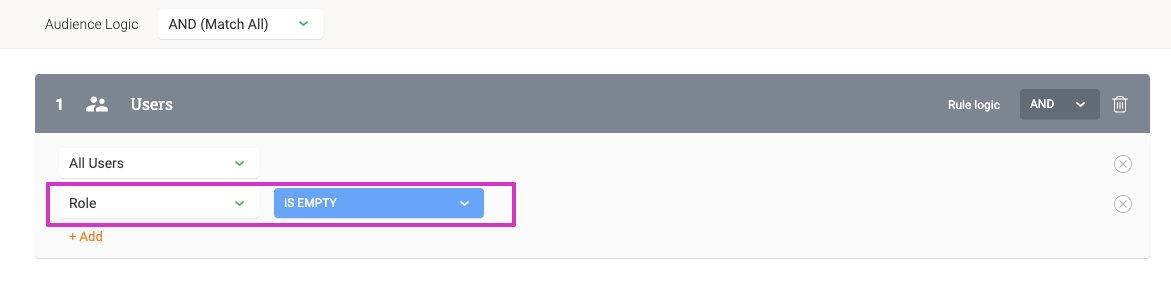
As for Audience Logic, you will probably want to set this up to be triggered when the desired PX User Attribute field is empty such as the following:
And, for Qualification Scope you would probably want to give the user many chances to update their data with some time in between requests such as the following.

I hope this helps someone with similar use cases, but we would love to get your feedback and other interesting use cases that you come up with too.
Happy PX-ing!