

Cristina
Helper ⭐️⭐️⭐️
February 1, 2021
Tutorial

How to embed the Atlassian Status page on your community

  • February 1, 2021
  • 11 replies
  • 2090 views

As much as our organizations are trying to prevent incidents from affecting the service we’re offering, they cannot be entirely avoided. To keep customers informed about any performance issue of your product or service, you are probably using a Status page to which your customers are subscribed. 

However, email inboxes can become quite busy and such a notification could get lost in there. Moreover, the community is at the centre of your communication with customers, so why not push any Status notification on the community automatically? In this tutorial, we’ll show you how.

How to embed the Atlassian Status page

  1. Login to Status page admin environment
  2. Navigate to Status Embed (In the Status Page admin environment from where incidents are created)
  3. Pick an option to embed: default embed or a custom embed.
    1. For the default embed, you can customise the position of the embed and the colours of the messaging.
  4. Click “Copy code” (at the bottom of the page)
  5. Login to inSided Control and navigate to Customization → Third-Party Scripts
  6. Paste the code that you just copied into the After <Body> section, then click Save changes
  7. Test that your status embed is deployed with the following steps
    1. Open the community front-end
    2. Right-click the page and click Inspect (Chrome)
    3. Navigate to the tab Console
    4. Paste the following code statusEmbedTest() 
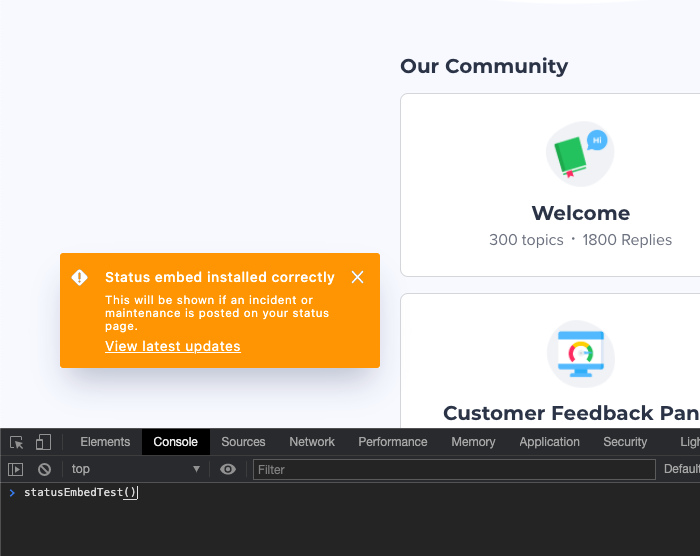
      Test the embed code in your Console


Are you using a different vendor for your Status page? Then we would love to hear from you if that vendor has the embed option as well, and how it’s being done. Maybe other community-owners are working with the same vendor → sharing is caring :hugging:

11 replies

davetee
Helper ⭐️
November 30, 2023


Hi @NovoTe ,

Here’s the most current embed code from Status.io. Below is how I implemented that code in Insided. 

I added three blocks of code to show the Status.io notification in my top menu:

  • Block 1 is all the logic to decide what to show (Red, Yellow, Green icon) 
  • Block 2 adds the CSS
  • Block 3 tells the browser where to put the code on the page. I used Javascript to add the status to the top menu. A less complicated alternative would be to add Status.io’s HTML to an HTML Widget. I included both options below.

Block 1: I added this code into Control > Customization > Third-party Scripts : Insert in <HEAD>  

You’ll need to get the statusAPI value from the admin managing your Status.IO instance and add it to the code below. It looks like this : 

 https://XXXXXXXXXXXX.hostedstatus.com/1.0/status/XXXXXXXXXX

<script type="text/javascript">

$('.current-status-indicator').ready(function($){
var statusAPI = "YOUR_STATUS_API_URL_HERE";
var maxStatusCode = "";
var maxStatusDescription = "";
var sc = "";
var sd = "";
$.getJSON(statusAPI)
.done(function(data){
$.each(data.result.status, function(s,status){
$.each(data.result.status[s].containers, function(c,containers){
sc = data.result.status[s].containers[c].status_code;
sd = data.result.status[s].containers[c].status;
if (maxStatusCode < sc){
maxStatusCode = sc
maxStatusDescription = sd
}
})
})
if (maxStatusCode === ""){
return;
}
// Operational
if (maxStatusCode === 100){
$(".current-status-indicator").addClass("green");
$("#current-status-description").text(maxStatusDescription);
}
// Scheduled Maintenance
if (maxStatusCode === 200){
$(".current-status-indicator").addClass("blue");
$("#current-status-description").text(maxStatusDescription);
}
// Degraded Performance || Partial Outage
if (maxStatusCode === 300 || maxStatusCode === 400){
$(".current-status-indicator").addClass("yellow");
$("#current-status-description").text(maxStatusDescription);
}
// Service Disruption || Security Issue
if (maxStatusCode === 500 || maxStatusCode === 600){
$(".current-status-indicator").addClass("red");
$("#current-status-description").text(maxStatusDescription);
}
})
});
</script>


Block 2: Add the Status.io styles to existing <style> tag in Control > Customization > Third-party Scripts : Insert in <HEAD>  

/* Status.io Widget */

.current-status-indicator {
width: 12px;
height: 12px;
margin: 0 0 0 5px;
display: inline-block;
border-radius: 6px
}

.current-status-indicator.small {
width: 8px;
height: 8px;
margin: 0 0 0 5px;
display: inline-block;
border-radius: 4px
}

.current-status-indicator.green {
background: #27ae60
}

.current-status-indicator.yellow {
background: #ffa837
}

.current-status-indicator.red {
background: #c44031
}

.current-status-indicator.blue {
background: #00aaf0
}

Block 3: I added this code into Control > Customization > Third-party Scripts : Before </Body>

This injects the code that displays the status at the end of the top menu. Depending on the number of menu options you have, you may need to show the status somewhere else. 

<script>
$("*[class*=header-navigation-items_menu]").append("<a href=""http://YOUR_STATUS_IO_URL"" target=""_blank"" style=""margin-left: 0px;margin-top: 1px;""><span id=""current-status-description""></span><i class=""current-status-indicator""></i>");
</script>


If you don’t want to mess with the Javascript, you can always add Status.io’s HTML to an HTML widget. This is in place of Block 2, not in addition to it. 


<p>
<a href="YOUR_STATUS_IO_URL" target="_blank" style="margin-left: 15px;"><span id="current-status-description"></span><i class="current-status-indicator"></i>
</a>
</p>