Manage Your Profile and Account Settings
This article helps community members manage their profile, preferences, notifications, and account security in Gainsight Customer Communities.
Overview
Your community account settings give you control over how your profile appears to other members, what notifications you receive, and how you manage your account security. All settings are accessible from a single Settings page, organized across four tabs.
- My Profile: Update your profile information
- General Settings: Configure general preferences and download your personal data
- Notifications: Manage email notification preferences
- Password: Change your password
Complete Your Profile Information
The My Profile tab lets you update the information other community members see on your profile, including your picture, company, job title, and a brief personal description.
To access your profile:
- Log in to Destination.
- Click your profile picture. A drop down menu appears.
- Select Settings. The My Profile page appears.
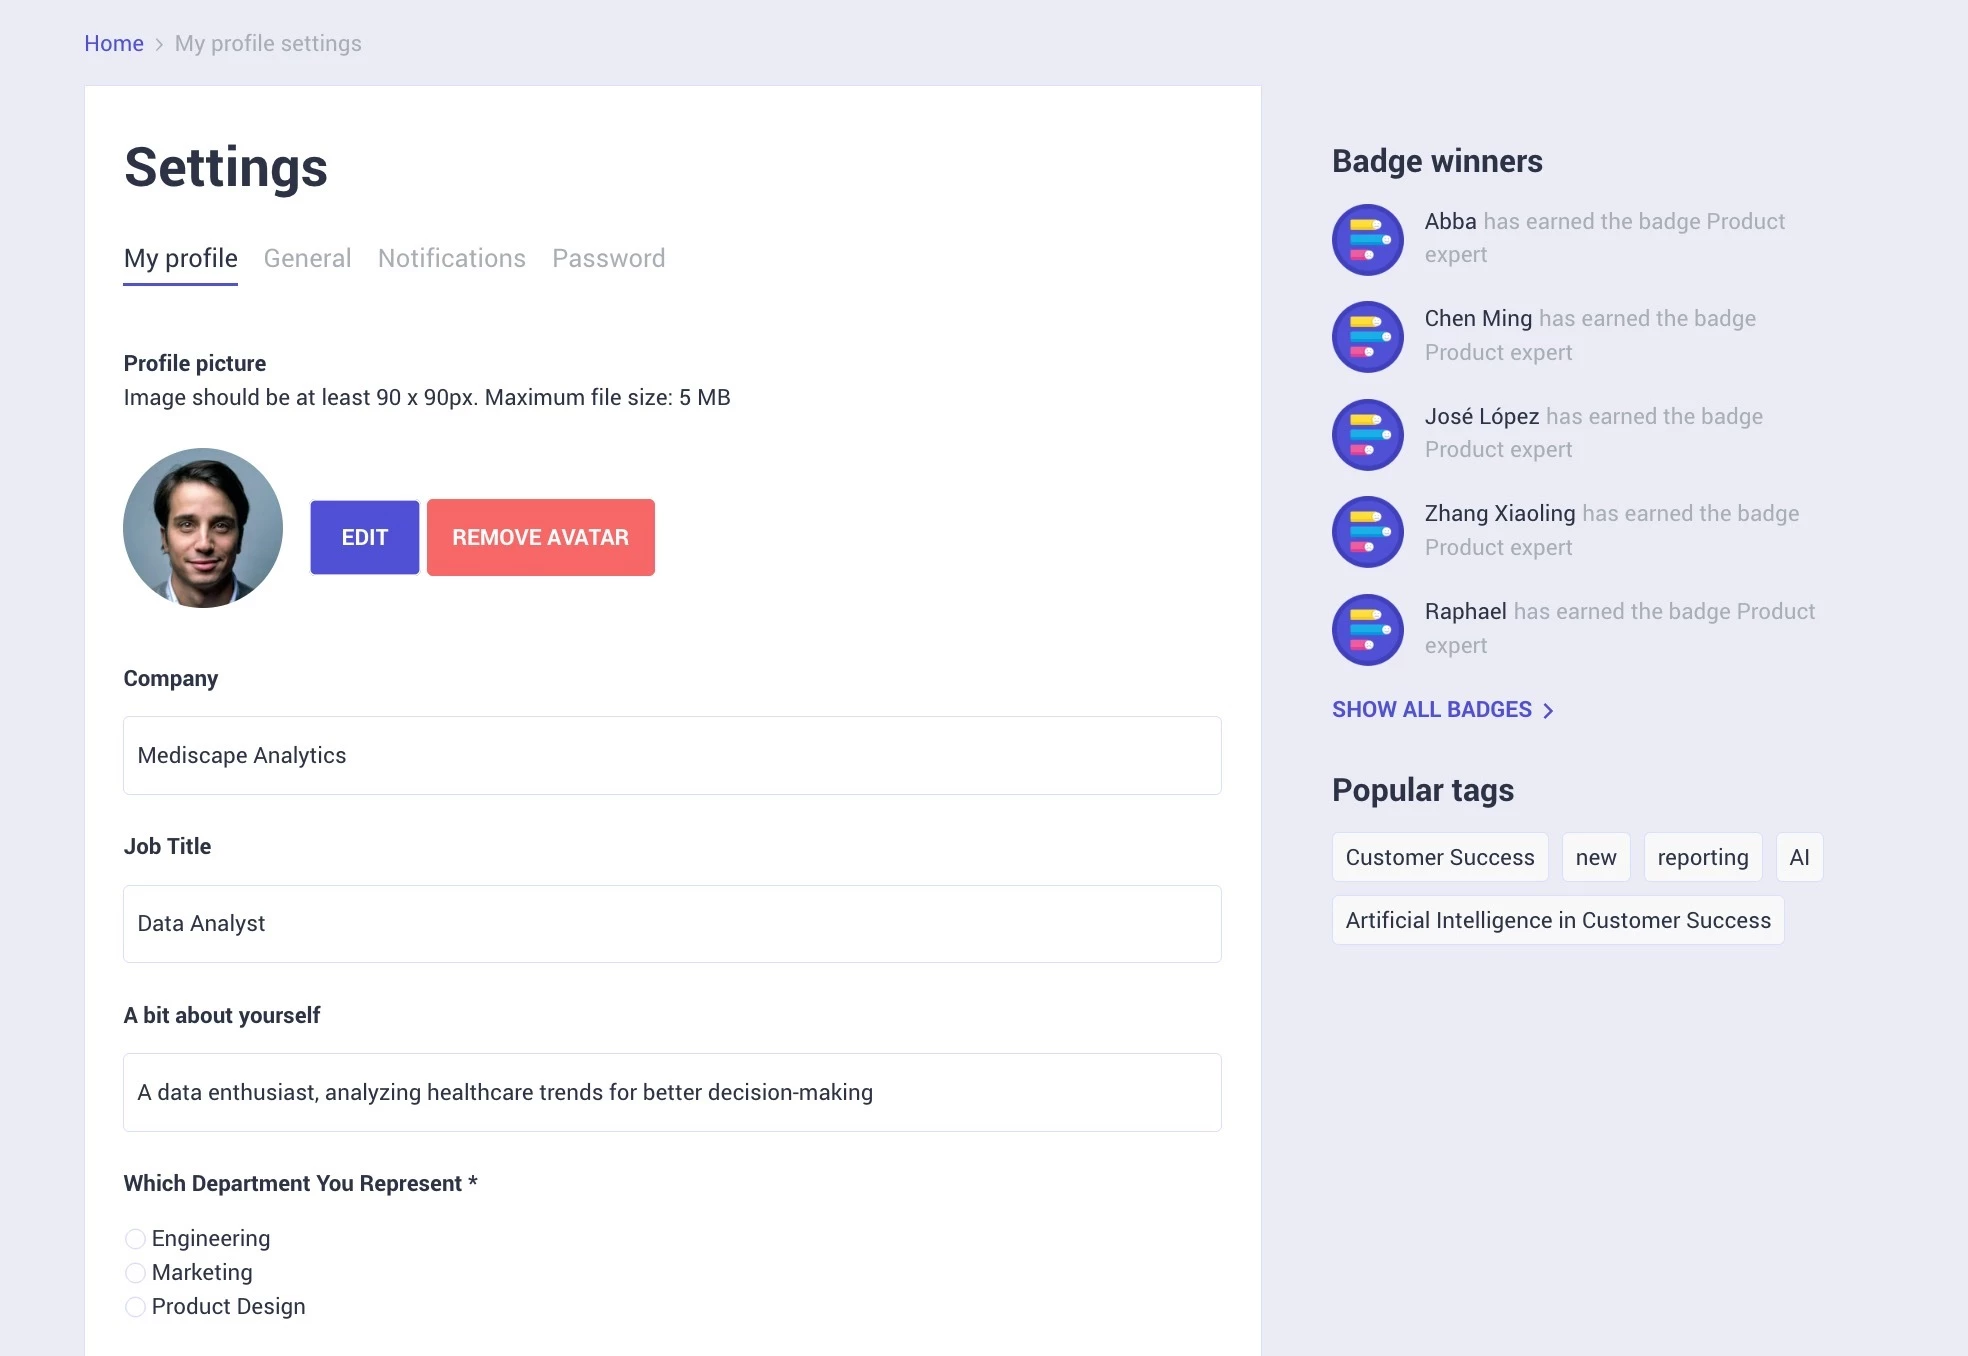
- Click Edit to update your profile picture.
- (Optional) Click REMOVE AVATAR to remove the profile picture.
Note: Profile pictures must be at least 90 x 90 pixels. The maximum file size is 5 MB.
- Fill in the details of your profile as required.
- Click Save to save the entered information.
Note: Fields marked with an asterisk (*) are required.
The following table describes some examples of the fields available in the My Profile tab:
| Field | Description |
| Profile picture | Your community avatar. Must be at least 90 x 90 pixels and no larger than 5 MB. |
| Company | The name of your company or organization. |
| Job Title | Your current role or position. |
| A bit about yourself | A short personal description visible to other community members. |
| Which Department You Represent | The department you belong to. Select the option that best describes your team. |
Additional fields can be added or existing fields deleted from the Control.
For more information on profile fields, refer to the How to Configure User Profiles article.
General Preferences and Download Your Data
The General tab controls how your community activity and profile information are displayed to others, who can send you private messages, and gives you access to download a copy of your personal data.
To configure your preferences:
- Log in to Destination.
- Click your profile picture. A drop down menu appears.
- Select Settings. The My Profile page appears.
- Select the General tab. The General settings appear.
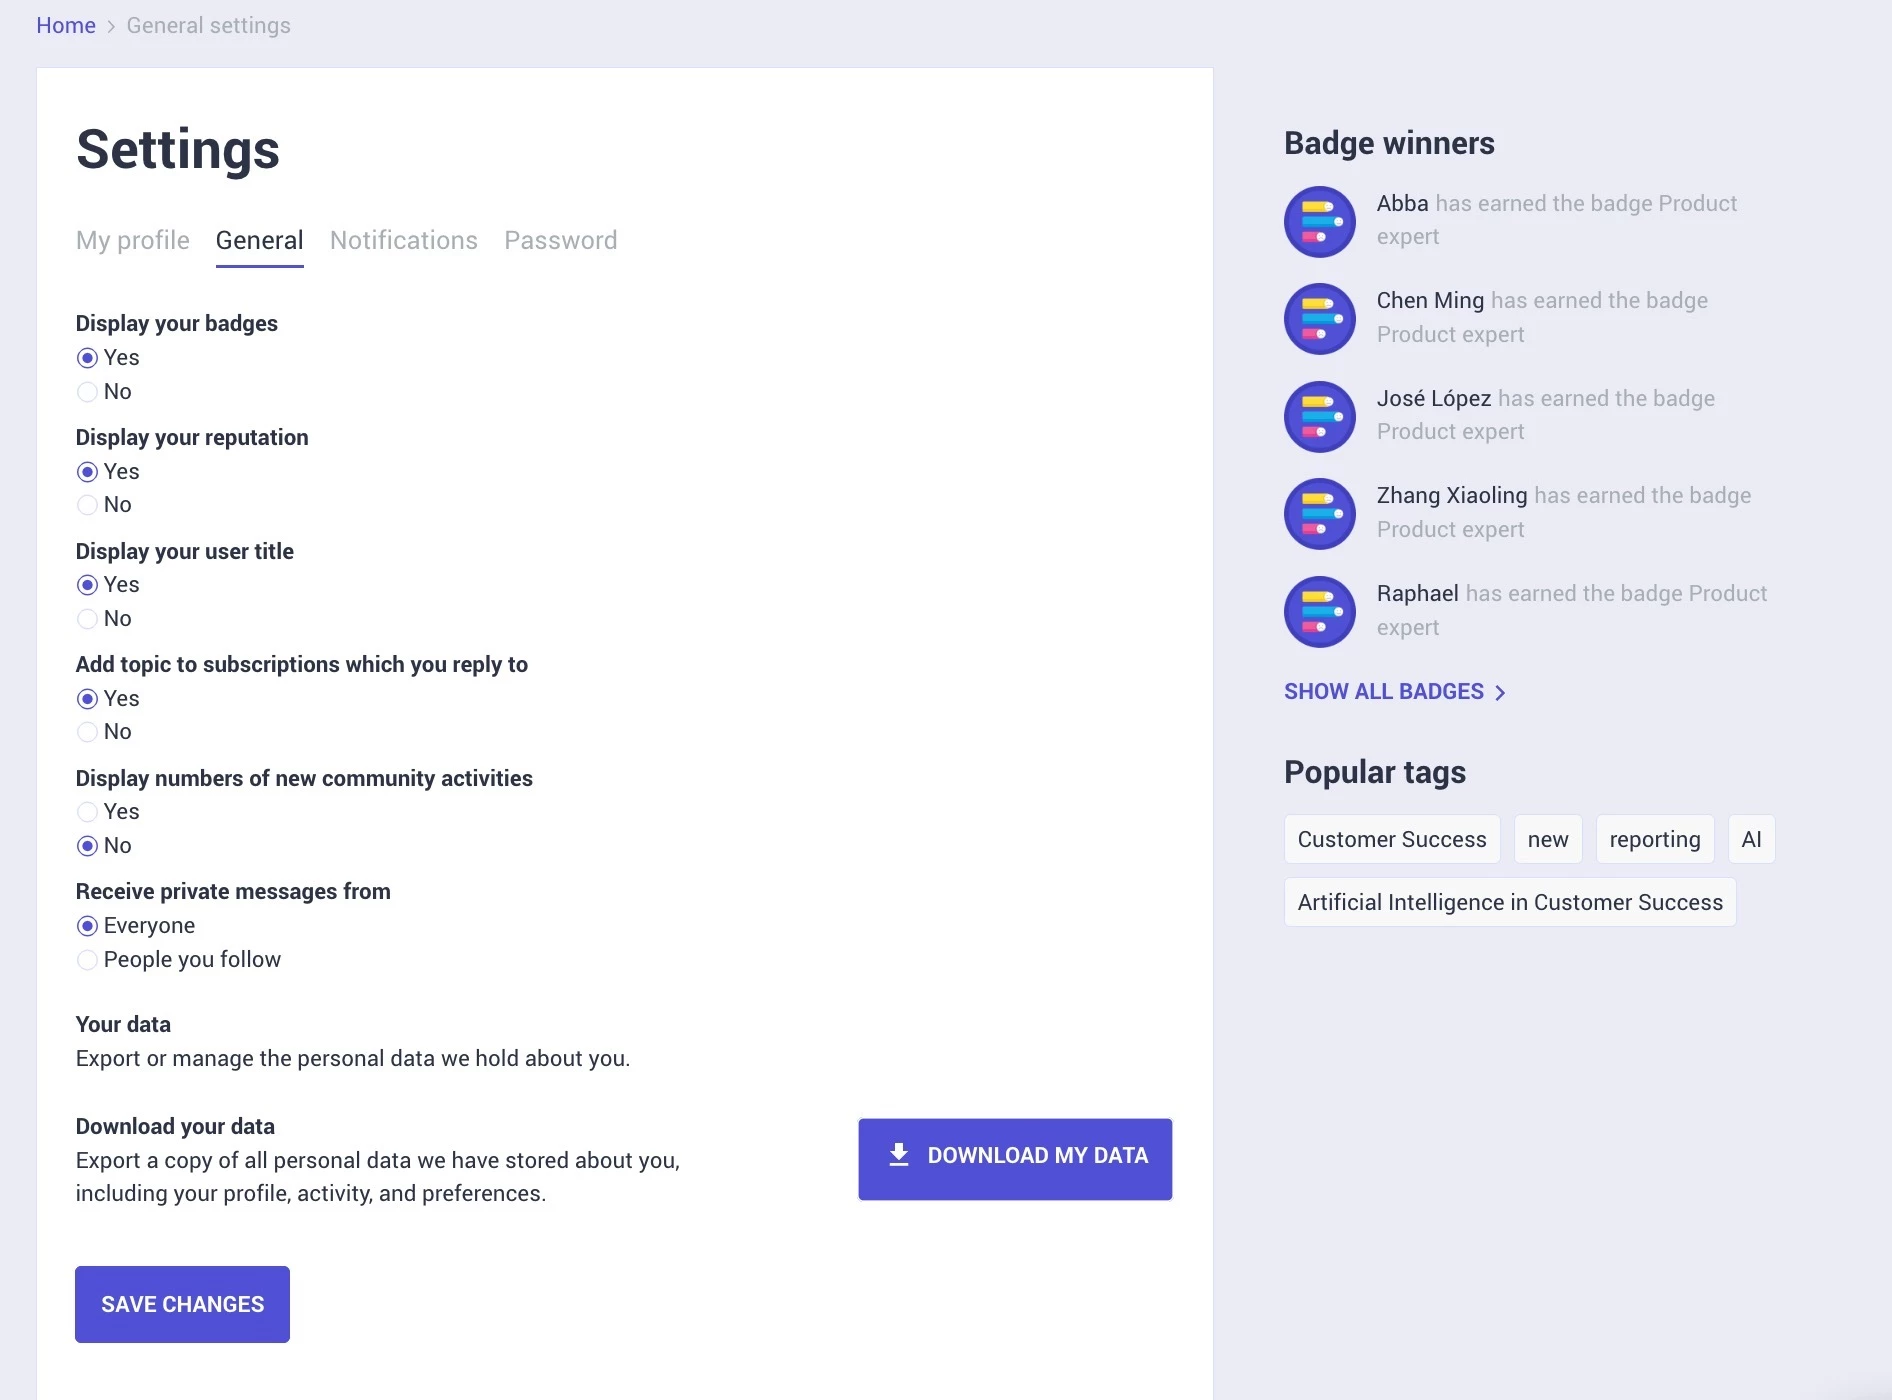
The following table describes the options available on the General tab:
| Setting | Description |
| Display your badges | Controls whether your earned badges are visible on your profile. Select Yes to show badges or No to hide them. |
| Display your reputation | Controls whether your community reputation score is visible on your profile. |
| Display your user title | Controls whether your user title is visible on your profile. |
| Add topic to subscriptions which you reply to | When turned on, you are automatically subscribed to topics you reply to. |
| Display numbers of new community activities | Controls whether activity counts are displayed on the community navigation. |
| Receive private messages from | Sets who can send you private messages. Select Everyone or People you follow. |
Download Your Personal Data
The General tab also includes a Your data section where you can export a copy of all personal data the community holds about your account. This feature supports your right to data portability under GDPR Article 20.
To download your data:
- Log in to Destination.
- Click your profile picture. A drop down menu appears.
- Select Settings. The My Profile page appears.
- Select the General tab. The General settings appear.
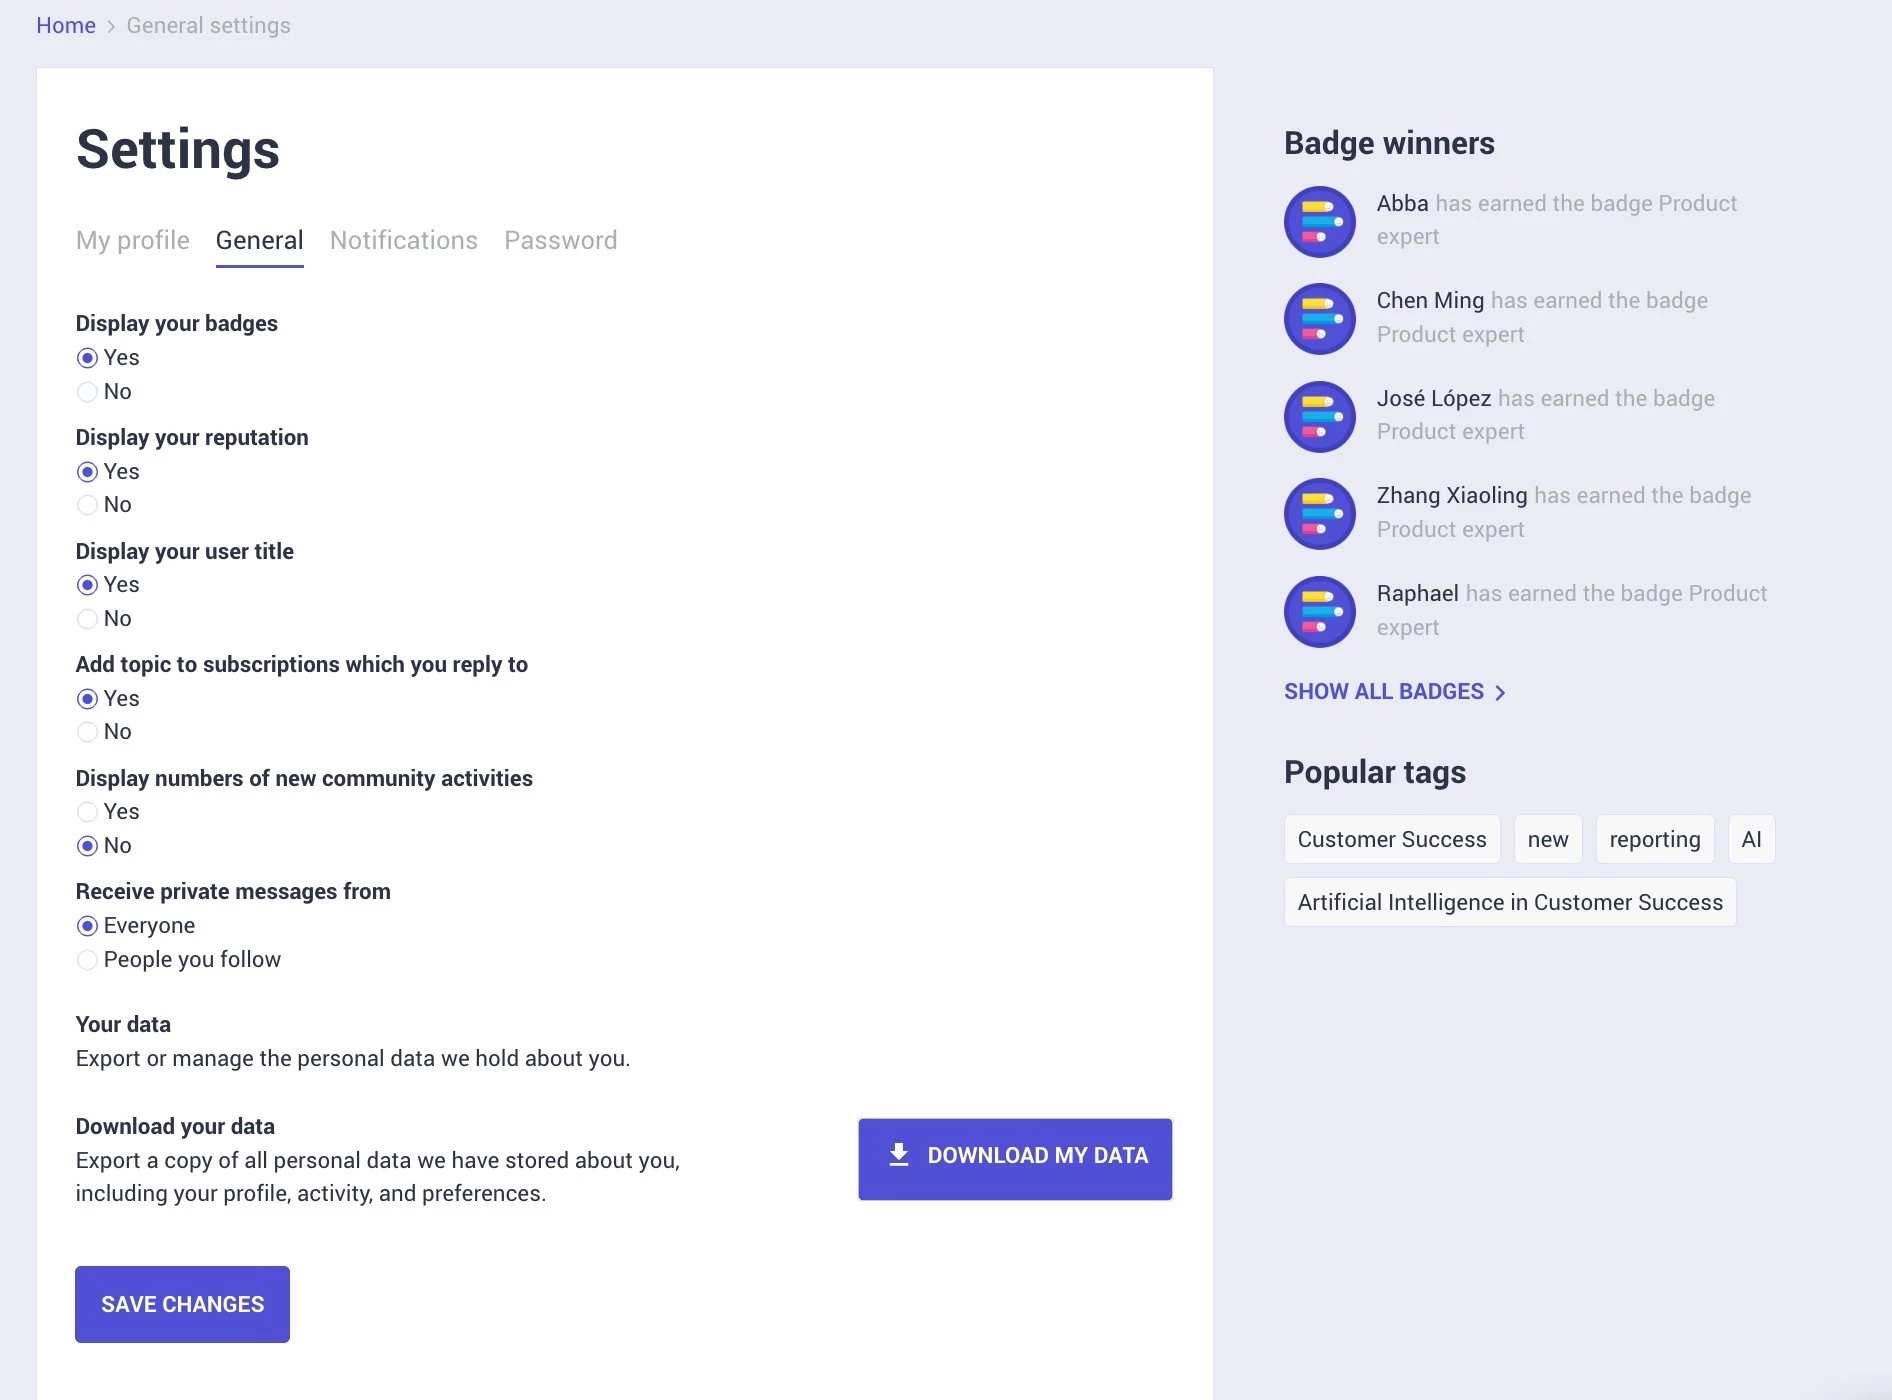
- Click DOWNLOAD MY DATA. A banner is shown at the top, stating your file is ready for download.
- Click Download Now.
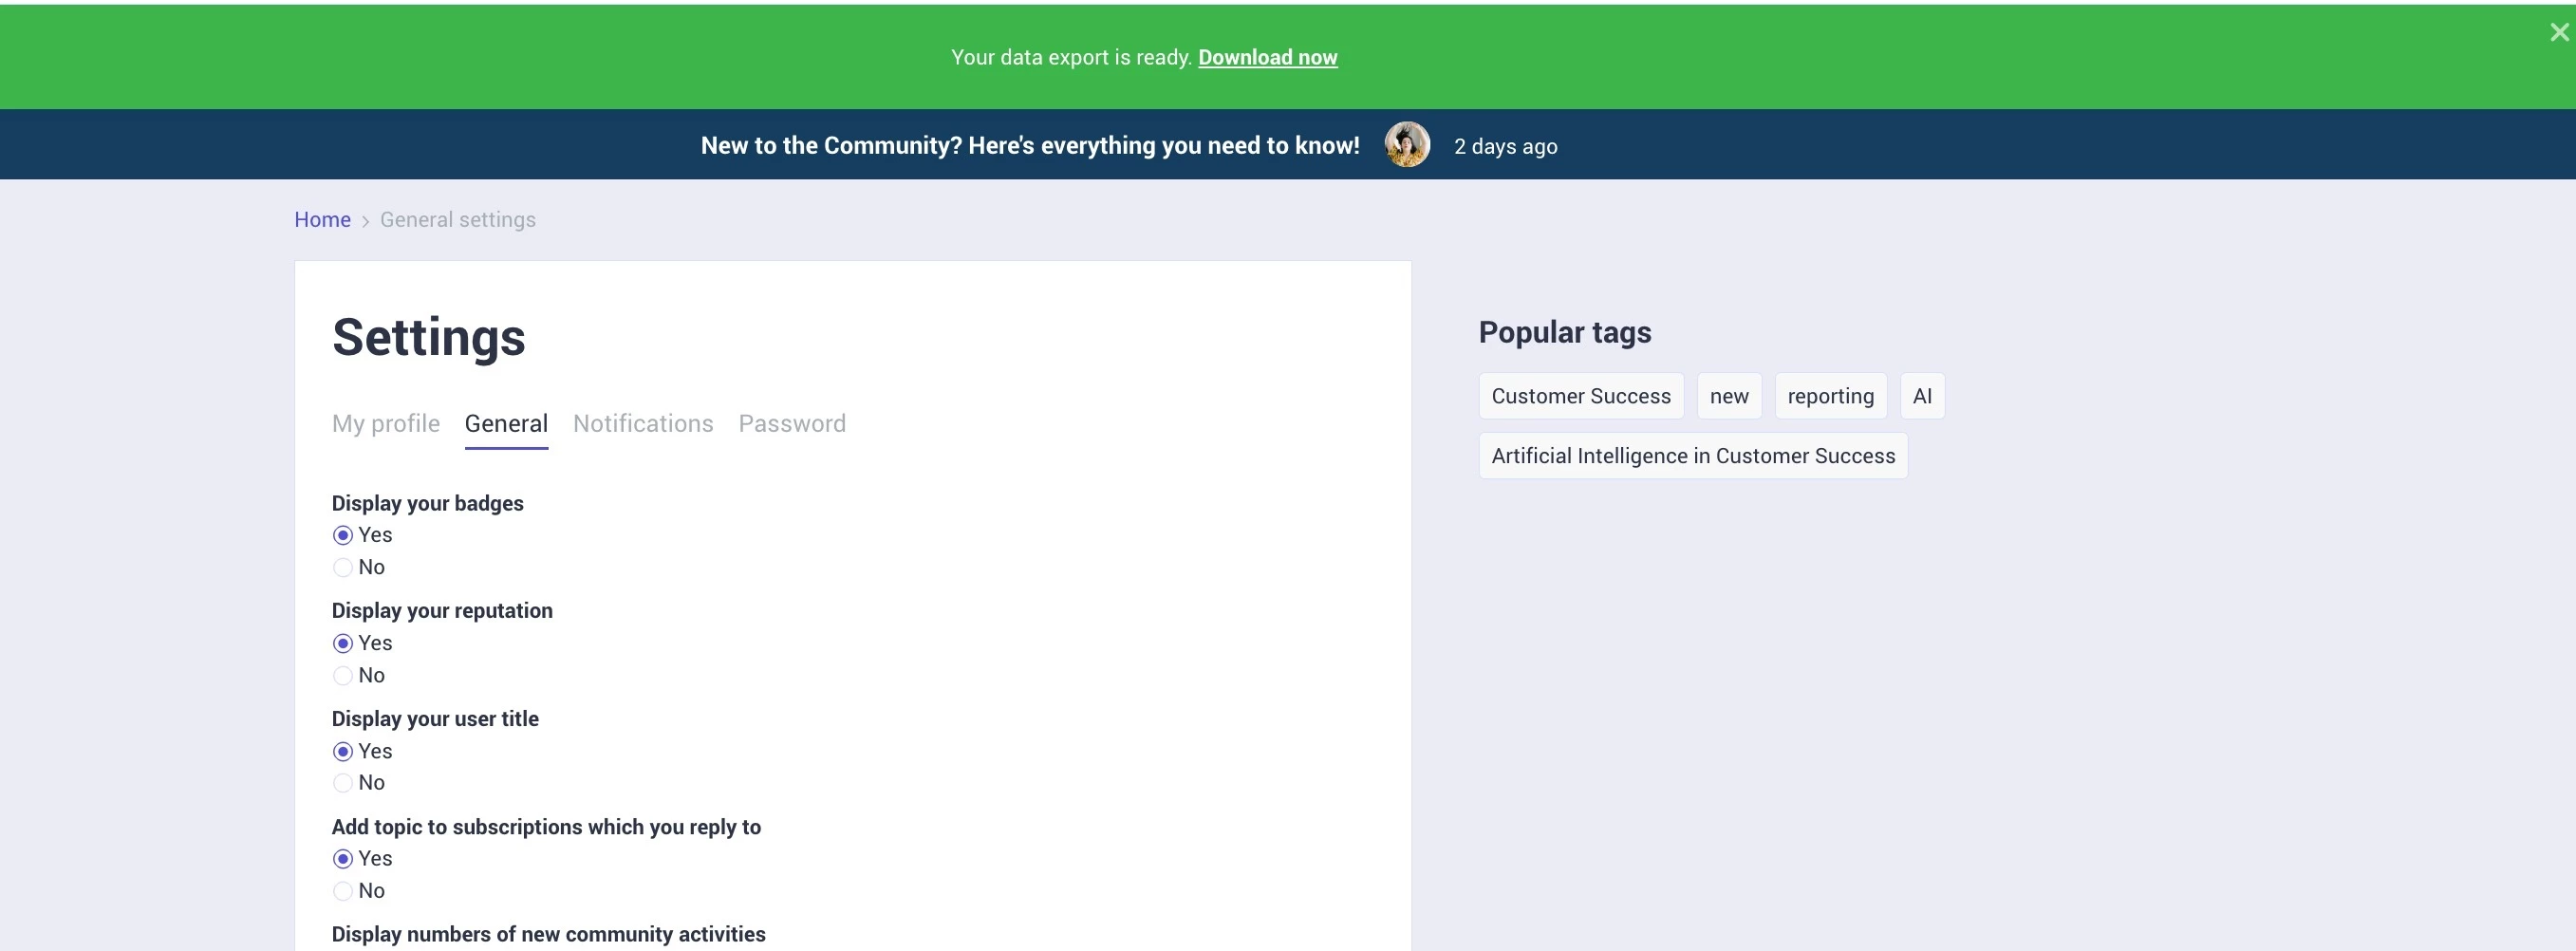
The data package includes the following information:
- Profile information
- Posts and contributions
- Private messages
- Attachments
Manage Email Notification Preferences
The Notifications tab lets you control which community events trigger email notifications. You can turn individual notification types on or off, and configure how frequently you receive reply notifications.
To manage your notifications:
- Log in to Destination.
- Click your profile picture. A drop down menu appears.
- Select Settings. The My Profile page appears.
- Select the Notifications tab. The Notifications page appears.
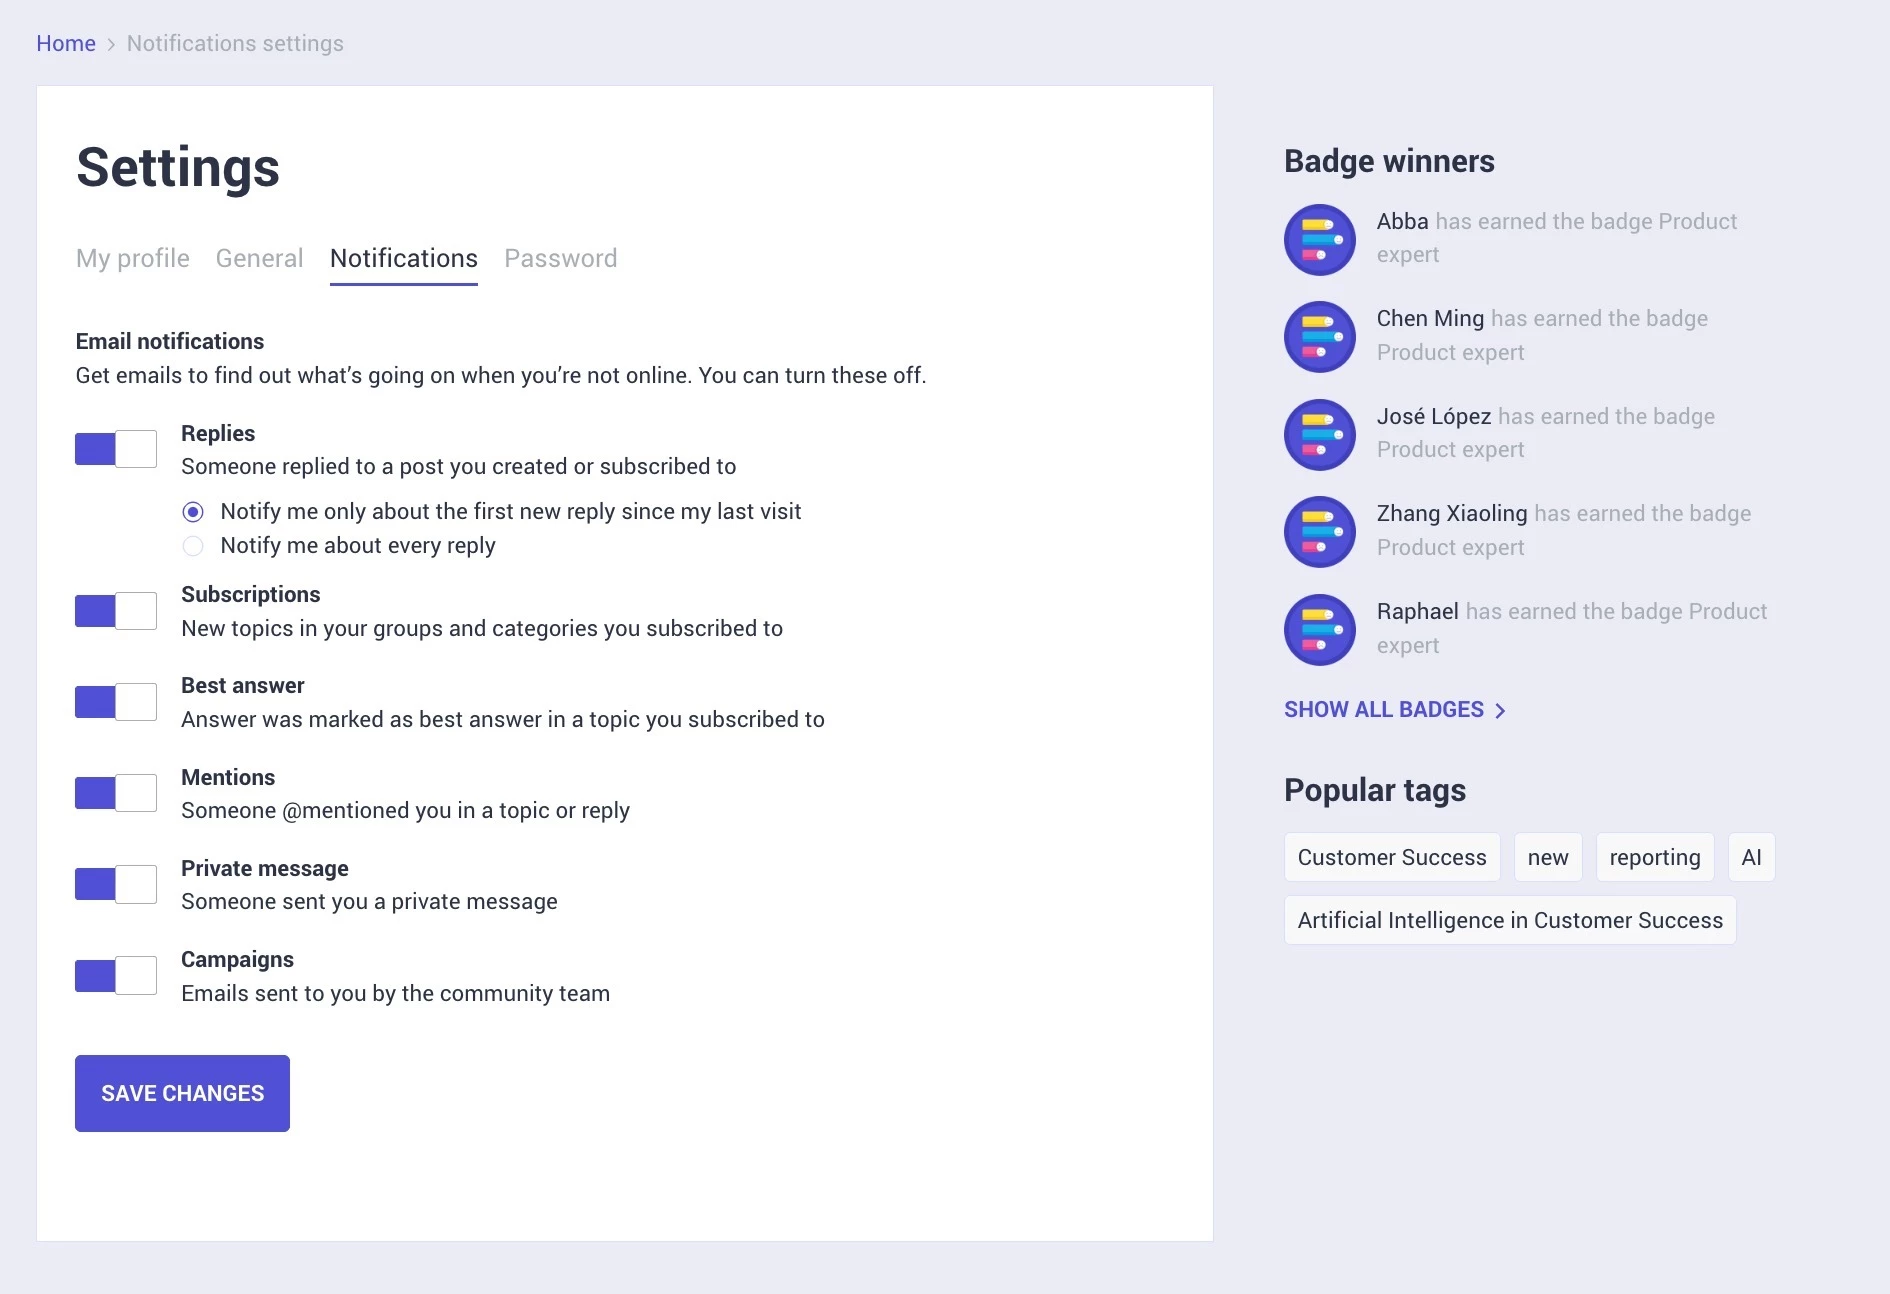
- Toggle each notification type on or off using the toggle switch next to its label.
- For Replies notifications, select either Notify me only about the first new reply since my last visit or Notify me about every reply.
- Click SAVE CHANGES to save the settings.
The following table describes the available notification types:
| Notification Type | Description |
| Replies | Sends an email when someone replies to a post you created or subscribed to. |
| Subscriptions | Sends an email when new topics are posted in groups or categories you have subscribed to. |
| Best answer | Sends an email when an answer is marked as the best answer in a topic you subscribed to. |
| Mentions | Sends an email when another member @mentions you in a topic or reply. |
| Private message | Sends an email when you receive a new private message. |
| Campaigns | Sends emails from the community team, such as announcements or newsletters. |
Change Your Password
The Password tab lets you update your community account password. You must provide your current password before setting a new one.
To change your password:
- Log in to Destination.
- Click your profile picture. A drop down menu appears.
- Select Settings. The My Profile page appears.
- Select the Password tab. The Password page appears.
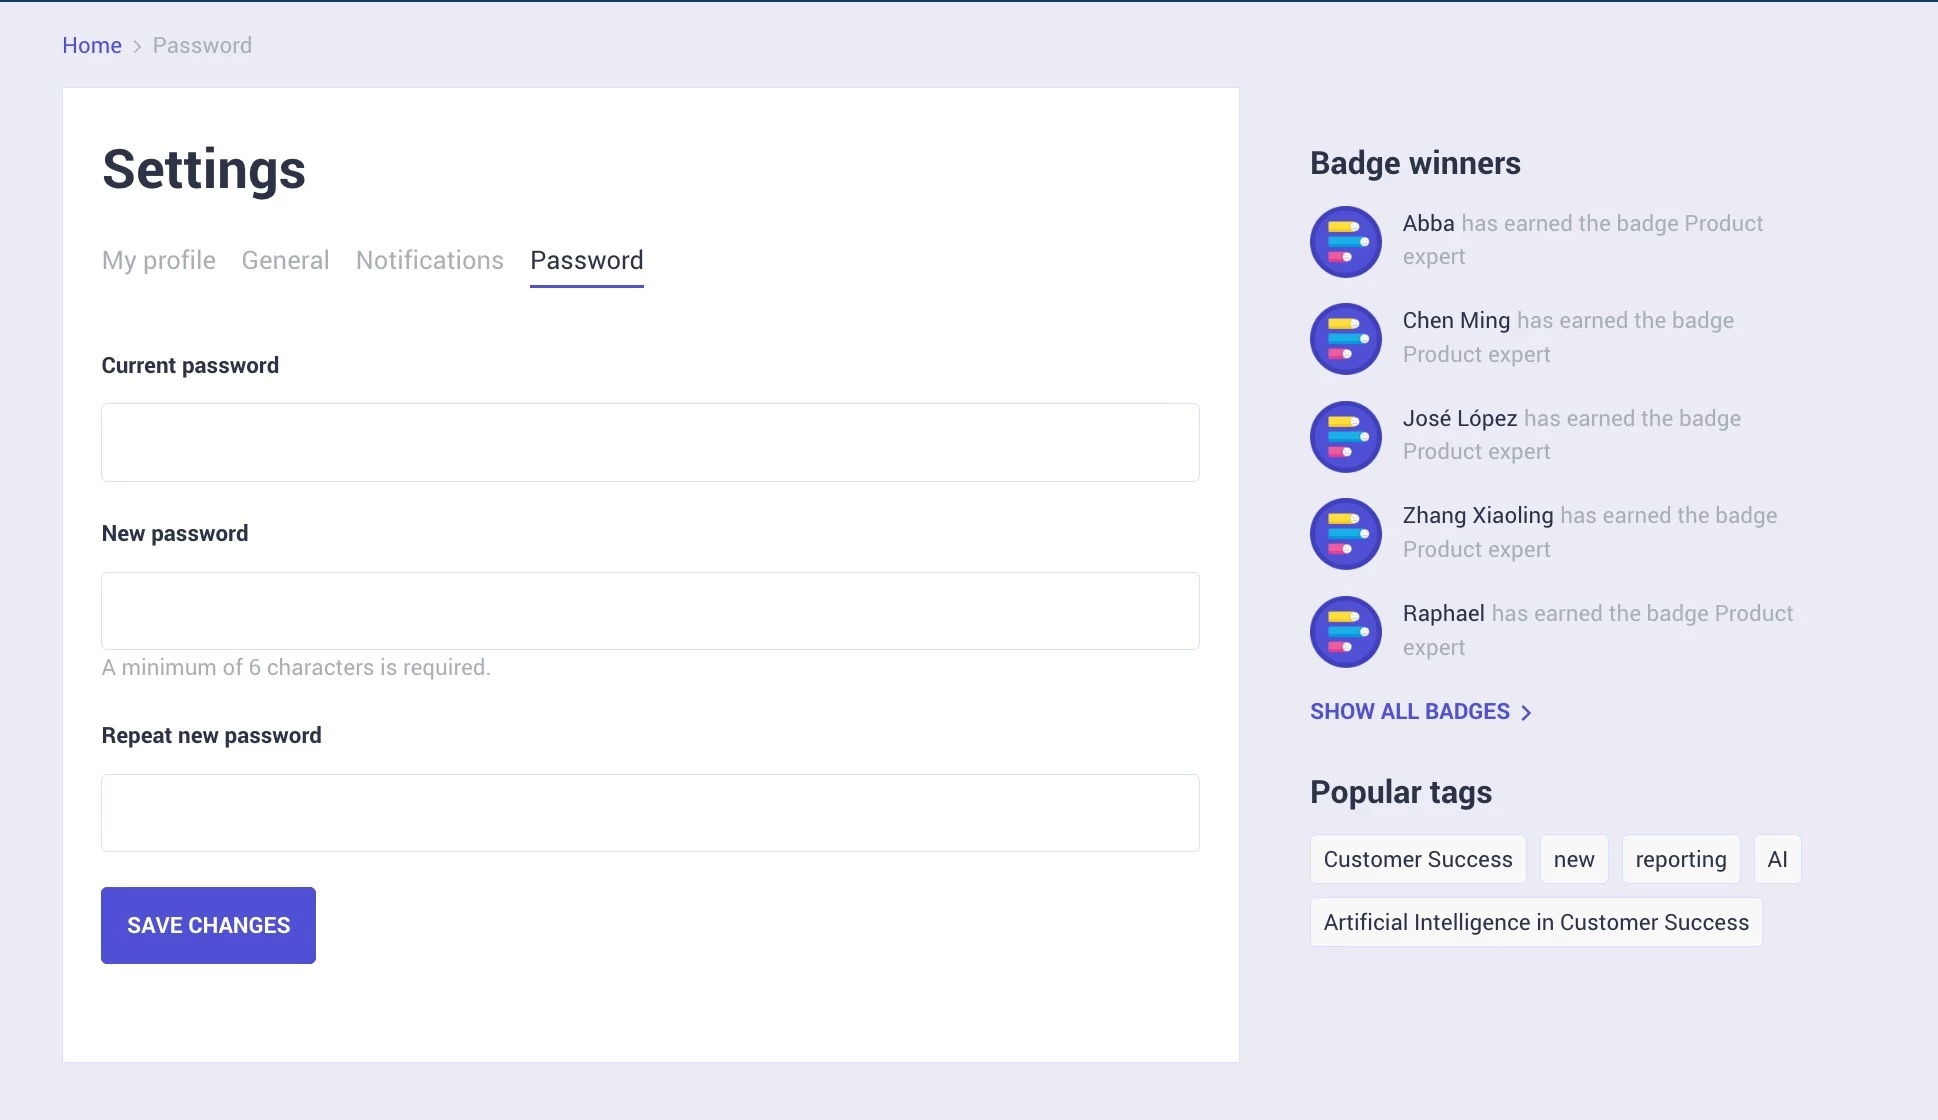
- In the Current password field, enter your existing password.
- In the New password field, enter a new password.
- In the Repeat new password field, enter the new password again to confirm.
- Click SAVE CHANGES. Your password is updated.