

Single Sign-on (SSO): Getting Started
This article outlines the basics of how to get started with setting up SSO on the inSided platform, including:
- Supported SSO schemes and how to set them up
- A step-by-step guide to how SSO works for end users on the inSided platform
- The various SSO configuration options offered by inSided
What is Single Sign-on (SSO?)
Single sign-on (SSO) enables your end-users to authenticate onto the Community through an Identity Provider of your choice, using a single ID and password.
Supported SSO schemes & how to set them up
Supported identity providers & how to set them up
Key Terms
- Community - Gainsight Platform
- Identity Provider - third-party service that creates, maintains, and manages users identity information
- User - end user of the Community
Community SSO diagram
Click ‘learn more’ to see a diagram describing the generic interaction between Community & Identity Provider.
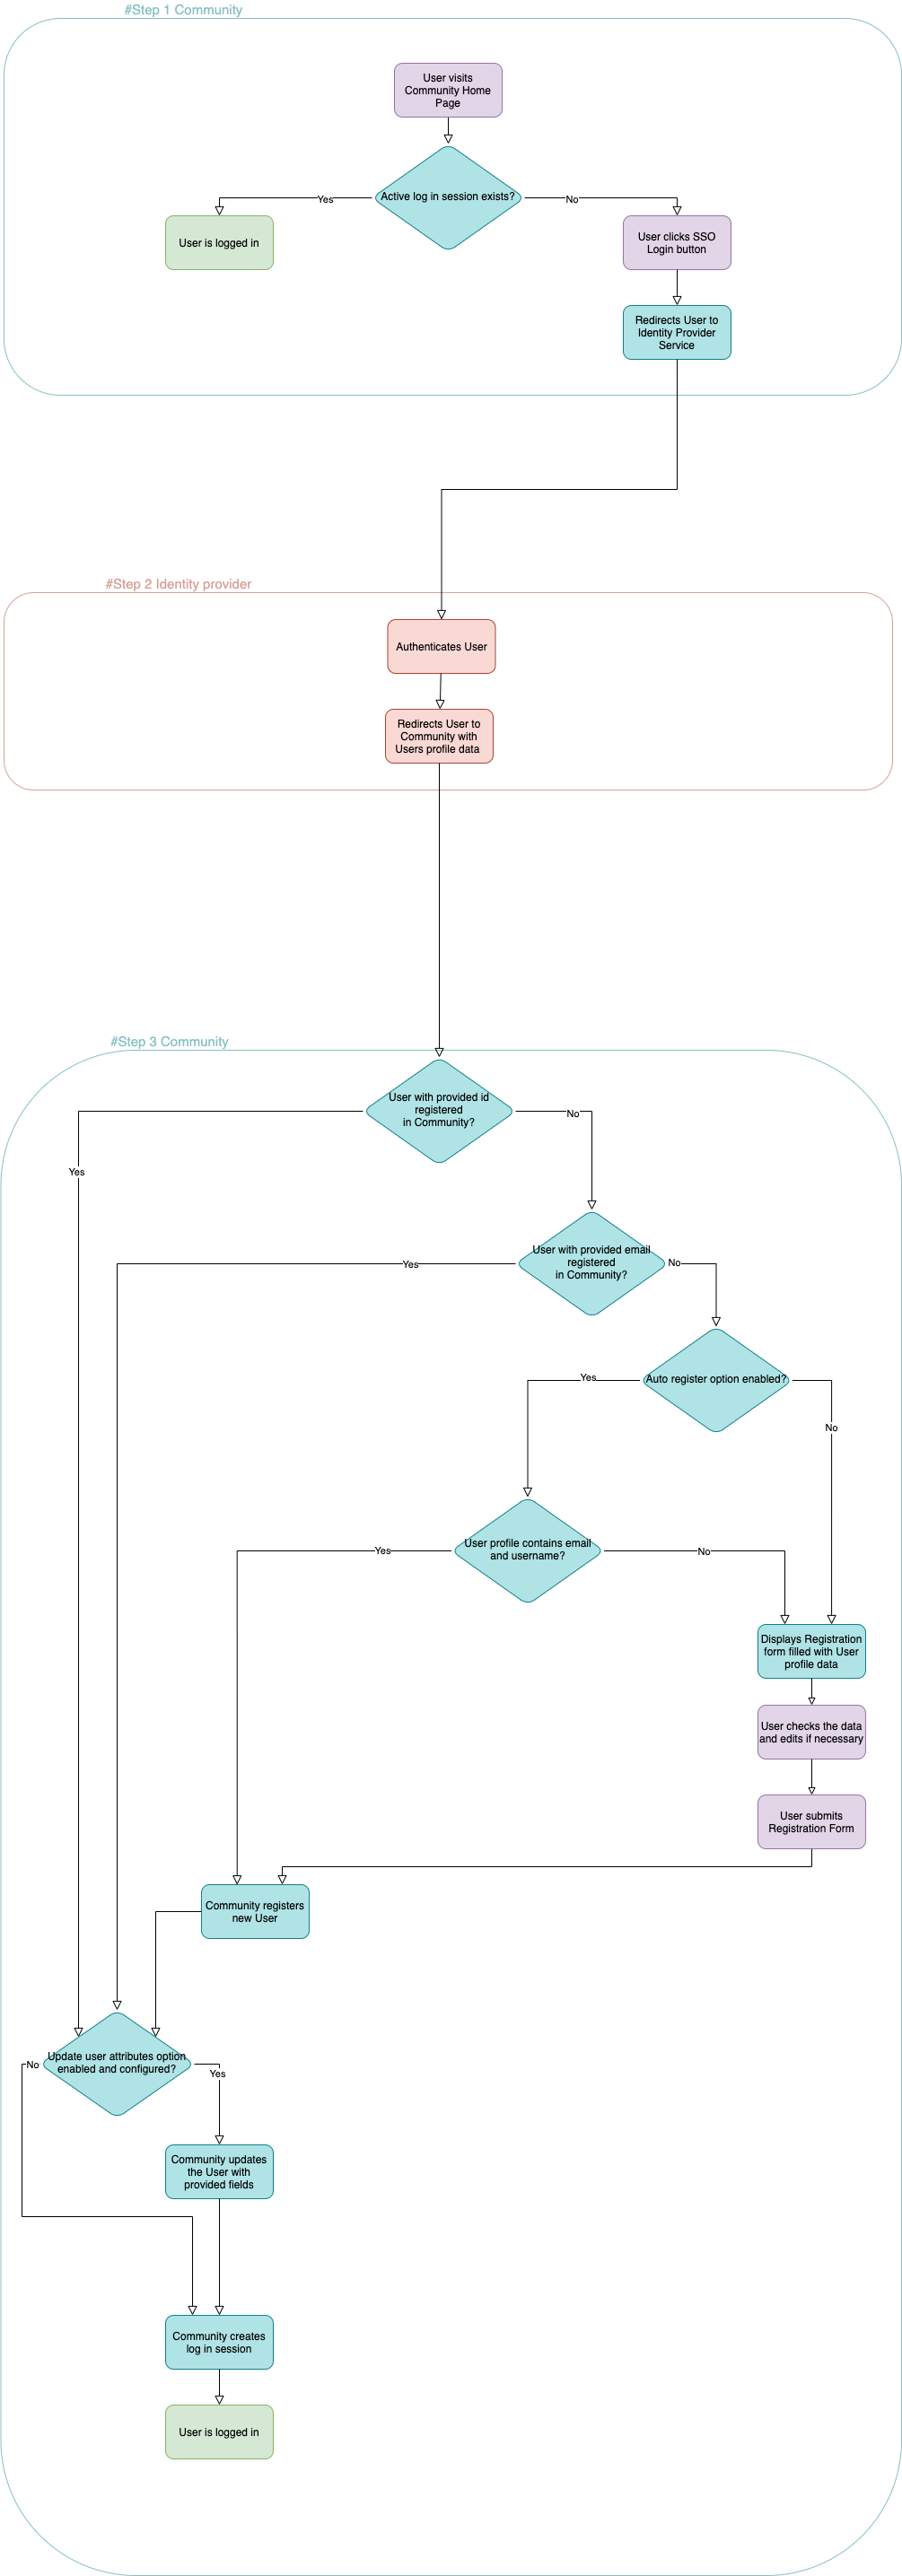
Community SSO detailed explanation
Independent of your chosen Community SSO scheme, the interaction between Community and Identity Provider can be described as a sequence of main three steps:
- User visits Community Home page
- If the session already exists, the User is successfully logged in.
- If the session does not exist, the User can start SSO Login by clicking on the Login button, and then clicking the relevant SSO button in the modal.
- It’s also possible to setup SSO Login without requiring a click on the Login button
Instead of clicking on the Login button, it is possible to initiate SSO Login by calling this
GETendpoint directly: https://sso.api.insided.com/auth/[SSO_SCHEME]?customer=[CUSTOMER_ID]- CUSTOMER ID: this is the first part of the URL of your Control environment (e.g. customer-id.insided.com)
- SSO_SCHEME : can be oauth2, openidconnect, saml, token, google
-
User is redirected to Identity Provider site
- The User simply needs to be authenticated here according to the rules of the Identity Provider.
- User is redirected back to Community along with Profile data
- The Profile data is used for registration or login.
- To be automatically parsed and mapped the Profile data should be sent as follows:
- id (required) string (e.g. "kd2fj09234ls8"), case insensitive ("qwerty123" is the same as "QWERTY123")
- email string (e.g. "bob@gmail.com")
- username string (e.g. "bob")
- avatar string in HTTP URL format (e.g."http://foo.bar/image.jpg")
- customRoles comma separated string (e.g. "1,2,3")
-
If the id field is not provided the User sees an Authentication failed error.
- Automatic login
-
- If a user with provided id already exists in the Community the User is automatically logged in.
- If a user with provided id doesn't exist and email field is provided, Community checks if there is a user with a matching email already registered then the User is automatically logged in.
- Additional automatic login options
- If update user attributes* feature is configured and custom roles update is enabled and customRoles field is provided, all current custom roles that the User has are replaced.
- If update user attributes* feature is configured and email update is enabled and email field is provided the email that the User has is replaced.
-
- Automatic registration
-
- If Automatic login fails, the Community checks if the auto register* option is enabled.
- If the auto register option is enabled, Community checks if both email and username fields are provided.
- If the fields are provided, the User is automatically registered, a login session created and the User is logged in (any separately configured required profile fields are ignored).
- If the avatar field is provided, the image is downloaded and attached to the User’s profile.
- Additional automatic registration options
- If Use left part of email as username is enabled, the local-part of the email field is used as the username (if username field is provided it’s ignored).
- E.g. if email is john.doe@mail.com then john.doe is used.
-
- Normal registration
-
- If Automatic registration failed or is not configured, the User sees Registration form filled with least Profile fields.
- The User edits them if needed, and submits the form.
- The User is registered, a login session is created and the User is logged in.
- If the avatar field is provided, the image is downloaded and attached to registered User profile
-

Logout
- If User clicks Log out and logout url is configured the User is redirected to that url
Profile data fields may vary per SSO scheme
E.g. OpenID Connect’s IdToken.sub will be recognised as id automatically.
The details of these interactions differ slightly per SSO scheme.
For instance, when implementing Token (JWT) it is as simple as in the diagram, but other schemes are much more “chatty”. i.e. the #Step 3 can be performed with several additional background HTTP requests in the background to the Identity Provider.
In any case, the Community always expects Profile data structured as described above at the end of any SSO journey.